

If you make PCBs and have any SMT components you likely need an SMT stencil to apply solder paste and then bake everything in an oven to reflow the paste. I’ve previously written an extensive tutorial on how to etch metal stencils from soda can material, still very popular, dirt cheap to make and pretty quick once you get a feel for it – it produces very high and extremely durable metal stencils. I’ve been literally using chemically etched soda can stencils thousands of times making Moteinos before I moved to stainless steel commercial stencils.
In this blog post I want to show you my new method that I’ve been using since I’ve purchased a laser cutter from china. It’s using the laser to etch stencils out of transparency plastic (mylar). Chances are that you already have membership or access to a local workshop or hackerspace where a laser cutter is available, so you can give this a try. The trick is to balance the power vs speed of the laser at that sweet spot where it won’t burn the plastic or over/under etch the pads. And for those really wondering why in the world I don’t order from OSHStencils (not affiliated with OSHPark) or similar affordable online services – some of it is explained in the video but mainly because instead of waiting a few days I can do it in 5 minutes, and the flat mylar allows making letter sized stencils. Don’t get me wrong, I support and use the OSHPark PCB service but I prefer to etch my own stencils on the fly on my laser, it’s really convenient and allows for errors and retries without another few days of waiting. Plus, I can do in mylar what they can’t in thin curvy kapton.
If laser etching is not an option for you, read below for another alternative method that yields great stencils from plastic transparency mylar.
Another method: using a Silhouette electronic cutting tool (obsolete – read below)

UPDATE (Feb. 2016): Reflecting back after laser etching stencils of all sizes for a long time, I think this cutter method is 1) obsolete and the edges produced by a cutter like this are most likely rough and trap lots of paste compared to laser etching, 2) slow compared to laser etching 3) expensive ($250 just to cut stencils?). So I only mention this method here for reference and because it has some historical relevance to DIY stencil methods. The best 2 methods you can achieve great quality DIY stencils are still my soda can stencil method (for small PCBs) and the laser etching method I describe above (for any size stencil).
Before I got my laser cutter, I’ve entertained the idea of getting a Silhouette Cameo hobby cutter tool (~$250) to use exclusively for making stencils after seeing what stencils are possible to produce. But then the laser came and etchig was much faster with great results so I gave up this extra tool (glad I didn’t waste $250). It involves scripting and converting between different formats and careful CAD resizing of the pads apertures and the complex details are probably not worth the trouble, but anyway here are all the links I saved from folks who researched this method:
Link 1, Link2, Link3, Link4, Link5. And some sample images, quite good quality (credit http://dmstudios.net):
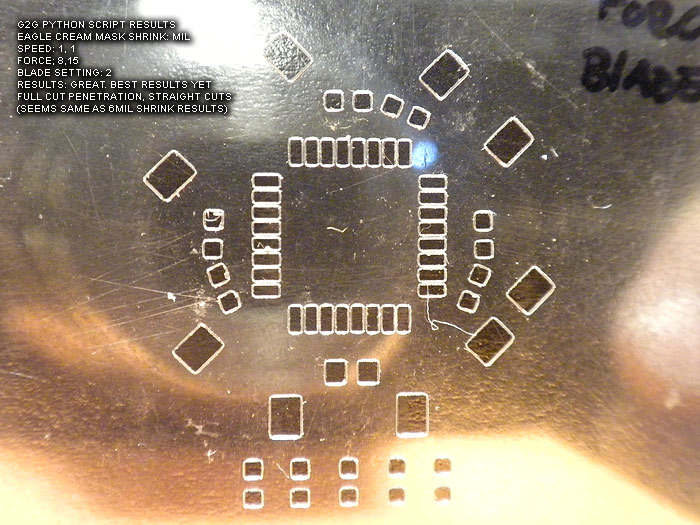 And another one (credit: http://pmonta.com/blog):

I think OSHStencils is not a Laen’s company (second comment): http://www.eevblog.com/forum/manufacture/osh-stencils/
Oops, I was under the impression it was. Thanks for the tip!
Great tutorial! I’m surprised you didn’t shrink pads like with metal stencils.
Quick question,what thickness of mylar sheet you are using and where do you buy it? I tried it with Grafix Clear .005 Dura-Lar Film, but I think it’s too thin… Not getting consistent results with my laser cutter….
I use 3M PP2200 mylar transparency film. Look it up on ebay, you can find a box of 100 sheets for ~$15. Amazon sells it for much much more. It’s 4mil thick (0.1mm).
Pingback: Cutting SMT Stencils with a Laser | Hackaday
I have been using this method for a while now, it works well. I use 3M CG 3700 transparency film which is more readily available for me (5mil).
Yes, engraving is the only way to go here. With my 50W laser I set .3mm Y step, 200mm/s speed and 12.5% power which gets me the best result, i.e. the least amount of burring and clean holes. Experimentation is key as every laser is different.
It really helps to add alignment holes to your PCB and stencil if you have the room. I usually go for 3mm holes which tend to be a nice and tight fit with common M3 bolts.
Pingback: Laser Etching SMT Stencils Tutorial « Adafruit Industries – Makers, hackers, artists, designers and engineers!