
In previous posts (here and here) I described my efforts and research to develop a DIY method to make good quality SMD metal stencils at home. I have since experimented some more and I believe I found the best method (so far) to do this with very cheap materials, yielding very good results.
Since transferring the toner to the soda can aluminum alloy was the most challenging part, I kept experimenting with different transfer mediums and other ways of possibly facilitating and perfecting the transfer.
Finally the solution is here: consistent, repeatable, “perfect” toner transfer, every time.
Step 0 – Be safe
Be safe and wear a respirator mask, goggles, gloves and use ventilation! Your lungs were not designed for breathing acetone and acid vapors.
Step 1 – Prepare soda can aluminum
- Cut and unbend the aluminum on a flat surface
- Heat the aluminum with your iron for a minute. This will make the next step much easier
- The trick is to then chemically remove the interior can coating *without* sanding it off. Even grit 2000 sandpaper/steelwool will scratch the interior enough that toner will not transfer very well or could be inconsistent between attempts. A friend told me the interior coating is a resin epoxy layer. To avoid sanding, it can be removed with acetone from HomeDepot (the nail polish remover is not strong enough). Rub the interior coating with a paper towel soaked in acetone, it will wipe off fairly easily if you preheat the metal, exposing shiny metal. Wipe off the exterior paint as well
- UPDATE: I noticed there are different soda cans, some work very well, some give poor results. I noticed that the ones that are very shiny (chrome like almost) will give flawless toner transfer. Coke and Dr Pepper cans seem to work well. I have a batch of known good cans saved for stencils. You might have to experiment to find a good brand or type of aluminum alloy cans that give you good results.
- UPDATE 2: – I’ve done a video and writeup on how to enhance a cheap laminator with a dimmer to use as an alternative to clothing iron for the heat+pressure transfer, perhaps this will work better for some people that don’t have much luck with the iron
Step 2 – Print the toner mask
See my first step through post or the youtube video for details how to prepare the cream layer and shrink the pads before printing – this is important because the etched pads should be ~30% smaller than the PCB pads to avoid dumping too much paste and cause solder bridging. How much you shrink pads is up for experimentation. In my case 6-8mil smaller on all sides works well.
For toner transfer I tried many things and initially I recommended transparency film. It works quite well. But there’s something even better: vinyl ! I use self-adhesive shelf vinyl from the dollar store. I got a roll of several feet for 1 dollar. Can’t beat that. It’s perfect because it’s very thin/flexible and does not wrinkle, also very easy to spread evenly. The adhesive backing sticks to printer paper, will never jam the printer and the print is high quality. Adjust your toner density if you can to print as much toner as possible.
Step 3 – Transfer the toner
I then use a stack of sticky notes to transfer the toner. I peel the topmost sticky note a little and sandwich the metal and vinyl in the opening then push the sticky note back flat. The sticky note’s adhesive keeps the vinyl from moving. I’m sure there’s many ways to do this, I just found sticky notes work well and it’s quick.
Then set your clothes iron to maximum heat, drain any water to avoid steaming. Let it sit on the sticky note stack for 30 seconds. Then start applying pressure back and forth for another 30 seconds or so. Then lift the metal and dip it in cold water for rapid cooling. Remove the sticky note. Then remove the vinyl gently, it peels off easily, no soaking, no rubbing. And voila, perfect transfer! Feels good doesn’t it?
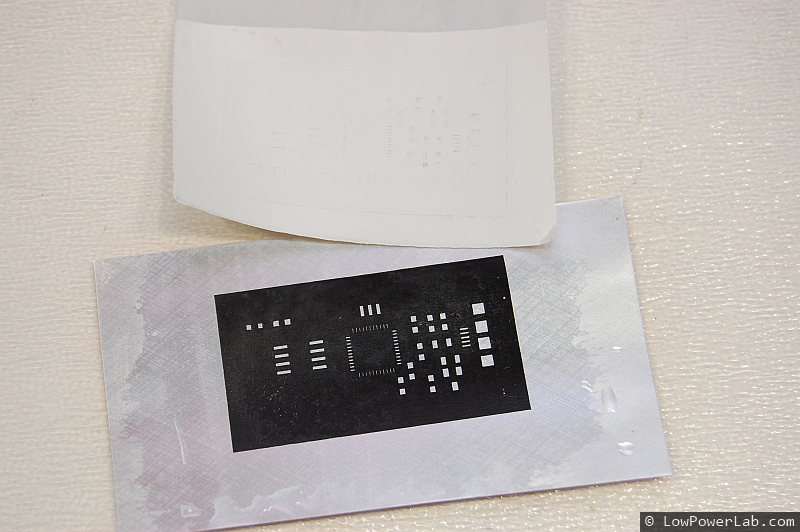
Step 4 – Touch up and mask rest of metal with clear tape
The laser printer like everything ephemeral will sometimes have less than perfect prints with tiny tonerless spots. You can reprint or touch those up with a sharpie pen after the transfer. Then I tape everything in clear tape avoiding air bubbles on the back where pads etch through.
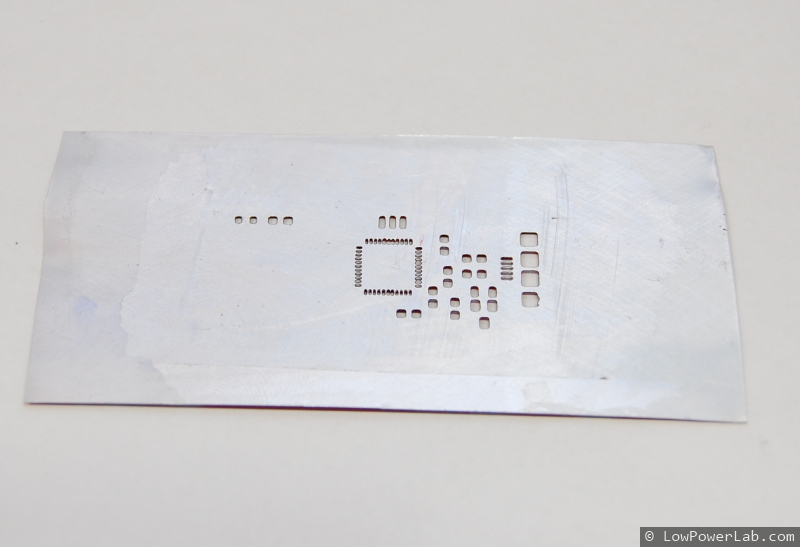
Step 5 – Etch and cleanup
I etch the stencil in 1:3 muriatic acid to hydrogen peroxide solution. In a few minutes the pads come through the other side. Watch for over-etching. Then rinse the acid in water, remove the tape and wipe off the toner with the HD acetone. Done!
Costs
- Soda can: free from recycle bin
- Acetone 1qt – $7 – HomeDepot (lasts a long time)
- Muriatic acid 1gal (31.5%)- $7 – HomeDepot (lasts “forever”)
- Hydrogen Peroxide (3%) – $1 – pharmacy
- Self adhesive shelving vinyl roll – $1 – dollar store
- Clear tape, sticky notes: $1
- Sharp tip sharpie pen: $1-2
- Your time: priceless
- Tools: laser printer, clothes iron, etc. (you already have these right?)
Conclusion
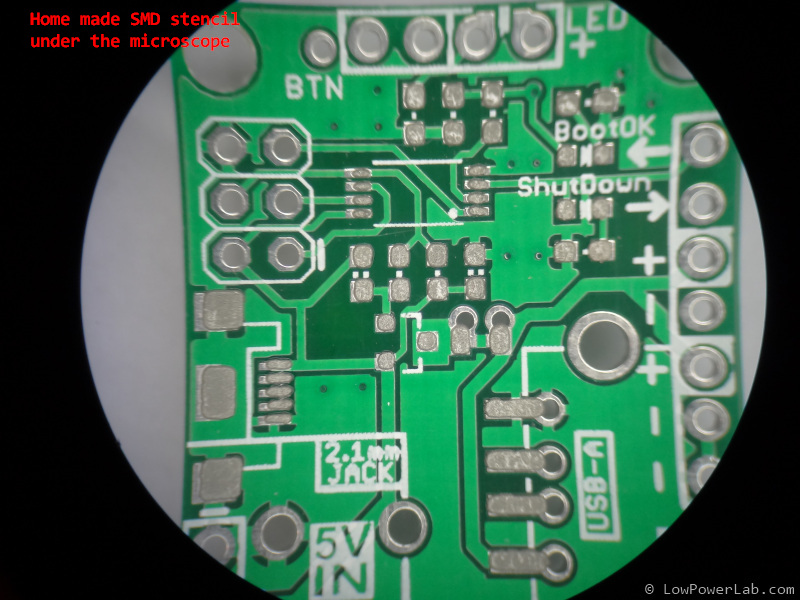
Metal stencils are a magnitude better than plastic stencils. Laser cut stencils are higher resolution than etched stencils but significantly more $$$. But when you spread the paste it won’t be a huge difference if you get the pads shrinking and toner transfer right. Just play around, you might mess up a few times, but this is really simple, really cheap, and really quick … takes about 30 minutes at most from start to finish, and it gets better as you practice.
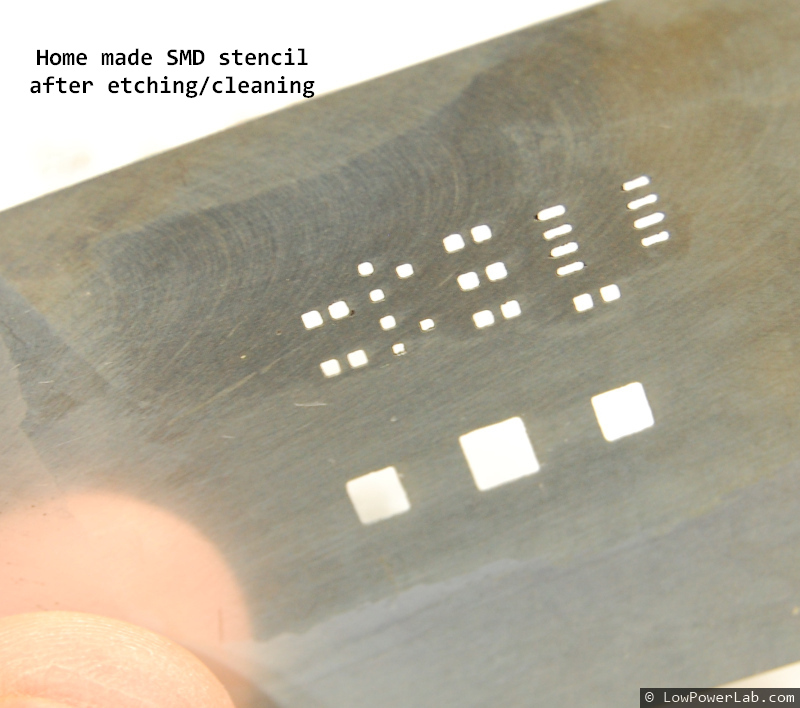
Some eye candy to prove this works
 |  |
 |  |
 |  |
 |  |
 |  |
 |  |
 |  |
 | |
Felix,
The tutorial is awesome, but it left me with a few gaps to fill in… I did my best as was nearly 100% successful with a VERY detailed stencil on my first try… I got the scaling of the images used for the stencil slightly wrong since I had to shuffle images back and forth from Windows VM’s to the real world of Ubuntu… but on the second attempt… Utterly successful… and I learned a few tips that I’d liek to pass along that worked perfectly for me.
1. Rather than risk my Cheap (but still rather expensive color laser printer with funky papers I bought the cheapest black and white laser printer I could find… a Samsung ML-2545 for $69 from Frys Electronics. A littel fiddleing got me a very niuce device driver for Ubuntu from Samsung that installed easily.
2. Use Glossy Phopto Paper to print on (I bought a little packet of 50 sheets of 4″x6″ Canon “Photo Paper Glossy”, cost something like $12. I bought the small sheets becuase I will end up wasting a lot of the paper as I trim it to size for later.
3. Use Felixs’ recommendations for Viewmate (Windows.. ugh!) to finesse the gerbers prodiuced by Eagle, I ended up shrinking my D codes by only 0.005 since some of the pades for the TQFP 48 I’m using are too small to shrink any further, I think the resulting etched slots are around 2-3 thou is width… and ONE MY FIRST attempt I only had one gap between pads break through… ONE…
4. In order to clean the epoxy/varnish from the surface of the aluminium in the cans, Acetone works fine, but using paper towels to rub the stuff away is a pain and takes for ever… I used a conventional Scotch Brite Heavy Duty dish cleaning pad, the harsh green scrubbing side with only gentle pressure, almost immediately removes the epoxy with acetone and leaves a very gentle swirled pattern on the aluminium which I think may help adhere the toner in the following steps. Yes, I was surprised that the Acetone didn’t just dissolve the pad or the sponge… it was totally unaffected.
5. now comes the lucky part… transferring the image to the paper… I set the Samsung printer up to print to card stock (the only 4″x6″ paper size was listed as a postcard… whatever), this was a manual feed option for the paper, there is a slot on the front of the printer to feed manual paper supplies into.
I told the printer to print to the card, made sure that the image was exactly the right size… you can scale the image in the printer setting dialogue, i didn’t have to but it may be useful to move it in that dialogue to position it better on the card..
AND THE PRINTER JAMMED… it took the card in, deposited toner on the card in the exact position I wanted and jammed.. or at least couldnt; feed the card properly, opening up the printer and removing the toner cartridge I can see the card sitting there in the printer, with toner on it… I reached in and took it out to unjamm the printer… it wasn;t stuck there at all I guess it just missed the feed through to the heated rollers that bind the toner to the paper.. thats right the toner was perfectly layed out on the paper but had not been melted on a slight touch and its woudl all be messed up. I thought this might be worth try to I held on to that card with teh unfixed toner while I prepared the next steps.
6. Rather than try the Hot Iron method for transferring the toner to the aliminium, I hav an old cheap laminating machine (probably $40 ten years ago, about the same now). I very carfully put the aliminium and the unfixed toner printed card into the laminating pocket and fed it though the laminator a few time (I think 4-5 times).
7. The photo card sticks to the Aluminium with the toner so dousing it in large amounts of cold water helps break down the paper and then another miracle… you can scrub away at the paper with an old toothbrush to scrub the soggy paper off the aluminium, as the paper is pretty embedded in the toner but the toner is VERY firmly attached to the aluminium… almost looks like its galvanised into the metal. you can SCRUB away to get the last traces of paper off the metal, the slightly rough feel of the toner goes away completely when the last traces of paper are gone and the metal looks smooth and black with toner. Too much scrubbing will eventually cause a few thin spots to wear through the toner but I’m amazed at how attached this stuff is to the metal.
8. Etch with the recommended 1:3 (Muriatic acid from homedepot:Hydrogen peroxide 3% from pharmacy), and in less than ten minute I have a very nice, very very detailed stencil that I can clean up with a little more scrubbing with the acetone and the pan scrubber.
Perfect.
And although I probably spent $150 on bits and pieces if you count everything including the 10 year old laminator… if i make 3 stencils, I’ve broken even and every one after that is profit.
I tried using acetone (the strong stuff from home depot) to remove the paint from a soda can (cherry coke) and had a rough time getting it to come off. I tried heating then rubbing, soaking in acetone, rubbing with a scouring pad, but it is very slow going. Any suggestions? Have you found certain types of can work better? I see Dr Pepper in your video, maybe I’ll buy a 12 pack and try that.
I wouldn’t worry about the paint so much. It’s more important to remove the epoxy coating inside. I leave the hot iron on the can aluminum for 1 minute and that helps removing the epoxy. I just use a paper towel soaked in acetone and rub it hard without scratching the metal underneath, comes off pretty quick.
Use a Scotch Brite type of dish scrubber, the harsh side soaked with acetone as a fluid works really well. It leaves a very light surface swirl effect on the aluminium when its worked its way through the epoxy and is much faster than using a paper towel. I thin the slightly roughened aluminium surface that is left is great for helping attach the laser toner when it is heat transferred on. I leave the painted side of the can for later as the appearance of the pain color through the aluminium is a great indicator that you are getting close to done with the etching process (use a flashlight from below to make it very clear when the etch is getting close to done, I use a clear Tupperware tub as my etch tank) with the Muriatic acid+hydrogen peroxide etch solution, it takes around 10 mins to complete.
Felixs’ suggestion of using normal printer paper with a thin layer of craft shop transparent adhesive film is PERFECT for toner transfer, its easy to print, its very cheap, and gets perfect transfer with no need to clean up the aluminium afterwards, no paper residue etc.
Thanks for the fast reply. I did some experimenting this weekend and was able to produce a usable stencil after a while. I was never able to get the coating off with just a paper towel, even after soaking over night in aceton. I ended up using a dish scrubber, and that worked great. Transferring the toner was a bit tricky at first, but eventually after leaving the iron on for a few minutes I was able to get a usable transfer with shelving vinyl. My printer has a “reduce paper curl” option that I found helped as well, perhaps it lowers the fusing temperature? Or maybe I was just getting the hang of it. Either way thanks for the write-up, it was very helpful. To think I almost spent $25 on a mylar stencil…
Hey David – great to hear you’re getting results, and yeah it gets better and really pays off. I messed up many times (imperfect transfer, over etching etc) until I got the hang of it but I would never pay $25 for a plastic stencil and wait days until it gets to me .. I just can’t afford that time delay. Plus – these stencils will outlast your PCB revision. I’ve been using one same one to assemble hundreds of PCBs, still as good as new.
Excellent tutorial. I congratulate you!
I’m starting to design pcb. Researching I found dry film photo resist on ebay and has given me excellent results. I think it may be an alternative to the method enriqueser. I’ll be doing some testing in the week and comment results.
I leave ebay link.
http://www.ebay.com/itm/171039822109?ssPageName=STRK:MEWNX:IT&_trksid=p3984.m1439.l2649
Thanks for sharing.
Greetings from Mexico
I did try photo resist film, big mess, a lot of wasted time. But you might get better results … let me know, thanks.
Why not print straight from viewmate to the printer? I’ve been using vinyl toner transfer to do the boards. I’ll try making a stencil. I’ve always used the toothpick method to put the paste and an electric skillet to reflow.
I like to take the image and then do some extra work on it, flip it horizontally, multiply it so I can make several prints on 1 row in case the transfer is not perfect (usually it is though). Yeah, try making the stencil, it’s really worth it. Then try this method for placing the components, it will be a revelation. Here’s a video to motivate you: http://www.youtube.com/watch?v=VTYJg_McyXo
I have one of those pumps somewhere! No more 0603 parts dangling from the supposedly non-magnetic tweezer!
Can you also do a write up on Toaster oven you are using? 🙂 I assume you modified it….
It’s actually not modified, just bare toaster oven, I show how I use it in the pick and place pump video: http://www.youtube.com/watch?v=YhavXauuWqY
Great job. this looks like a great way to get some durable stencils. Would this work just as well with aluminum sheets from a hardware store? I want to build a stenciling station and having something of a set size so I could frame them up for repeat-ability would be great.
The only way to know is to try. If you can find that kind of anodized aluminum or something as stiff and flexible then it should work. I use can sheet because its free for me, and I don’t need them too big. The are some tea cans that are very tall, maybe you can use those…
Great idea, thanks. You can actually shrink the pads in the cream mask inside EAGLE without using a gerber editor: http://www.imagebanana.com/view/yl0tjoed/cream_mask.png
Thanks for the tip, I will five it a try.
Any advice/suggestions as to handling these chemicals safely?
You mentioned using a respirator mask, goggles, and gloves. Got any suggestions since they aren’t on the BoM?
You mean where to get them? Your hardware store would be my first guess. Whatever makes sense to use in a situation like that. It’s mostly the acid that I would be worried about if at all.
I’m in the middle of following your tutorial but I get stuck when I attempt the swell operation. My board has a chip oriented diagonally and the swell operation doesn’t seem to properly modify the pads for this part. Any thoughts?
Hmm… haven’t had that scenario before. Maybe there’s another gerber viewer that can do that?
Wait, does your part have rounded pads? Viewmate will not shrink pads that have round corners, so I always make my pads square.
Save the layer Tcream as PDF (PDF CREATOR is best )
load it to Corel Paint Shop Pro Photo X2.
settings: no transparency, no smoth, 600 dpi, rgb24bit. >
make negative image.
apply the filter edge erosion, menu >effects > edge > erode edge.
This shrinks all Tcream, one pixel !
make negative image once again.
save as .pdf or print …..
the game is done.
enjoy 🙂
Hi Felix,
Fantastic tutorial. What is the smallest pitch you have done with this method? What do you think is the smallest possible?
Thanks.
Jai
As shown in the images, the smallest I went was 0.5mm pitch, it works OK but you have to be careful not to over etch. However with pads that small you might get solder bridging if you don’t shrink the mask just right. For anything that’s not a chip, I would recommend the smallest components to be 0603, even if you have a pick and place machine. For hand placement with a tool like I built, 0603 is quite doable. Other chips like TSSOP (I have these on the FTDI adapter and ATXRaspi R2), the stencils I make give very nice results, with very rare solder bridges – but in these cases I like to reduce the length of the pads by about 30% in addition to the shrinking I do for all the pads. This is trial and error … after so many DIY stencils, I kinda know what works and what doesn’t and how to get the right results depending on what I’m etching. The more stencils I make at home the more I learn and better results I get.
I had a very hard time getting the toner transfer to work. I picked up a roll of the vinal that you had mentioned and I could not get it to transfer well. I’m using a Brother HL-2140 laser printer and had come across another site where they mentioned that if you had a setting for Transparencies, use that because it uses a lower heat setting to prevent the transparency melting during the printing process and finally used regular paper to print onto. I also had a difficult time transferring the toner as well as my board is 52 cm x 113 cm and was just too difficult to get a high quality transfer to happen. I found that some people had been having success using a laminator and found that some had modified their laminator to slow the motor during the process. I added a cheap light dimmer to a laminator I picked up at Harbor Freight Tools and this worked perfectly! Consistant toner transfers each and every time now. Just a couple of hints that might help some of you that were still having trouble with this process like me. Thanks for the post though, you had the best documentation and it helped me a lot!
Thanks for sharing your experience. The toner transfer is the hardest part to get right. A laminator might help with that if it’s hot and slow enough. Is it this laminator – http://www.harborfreight.com/9-inch-hot-laminator-92499.html ?
You said you used a light dimmer to slow it down? Any other modifications?
Yes! That is the same laminator that I just bought. I purchased a simple light dimmer switch for just under $4 from a local hardware store. One that pushes to turn a light on or off and then rotates to adjust the brightness. All I had to do is pull the laminator apart and was able to mount it inside the laminator. Then all I had to do was cut one of the wires of the motor and then wire the dimmer switch in series (in-line with the cut wire). Simple, fairly cheap and works very well! https://plus.google.com/photos/103964850390405805918/albums/5919962467605175745
This is an awesome write up, but I think for my time versus the reward, spending $5-7 at OSH Stencils to get a laser cut stencil is a better choice for me. I just order one from them when I order my board, and it’s always delivered before the board is, so there’s no extra time waiting. I’m all for DIY, but you may want to check out oshstencils.com.
John – I agree, most people prefer to pay and wait a few days, and it’s great that there are such services. Yes I invested a lot of time to perfect this method. However it’s so easy for me now that I prefer to have it in 30 minutes in my hand, a high quality metal stencil that will not wear down with thousands of paste applications (incomparably higher quality than plastic). I made MANY stencils like this and it saved me MANY hundreds of dollars in doing so, so I’m a pretty happy camper. DOH … maybe I should open my own chemically etched metal stencil service 😀
Hi felix,
awesome tut … def will try it ..
one question .. pls forgive the noobinesss ..
1:3 muriatic acid to hydrogen peroxide ..ie ( 1 part of muraitic and 3 parts hydrogen peroxide right ?? )
thanks in advance
chX
Yes, 1 part acid, 3 parts HP. That will be fairly strong, you can do 1:2 or 1:5 or other combinations if you need weaker/stronger solution. Add a little copper wire every now and then when the solution gets dull, it will revitalize it right back up.