

Moteino (8Mhz)
Description
IMPORTANT: Please see the Moteino 8Mhz Guide before you use this board, also read information below.
What it is:
Moteino 8Mhz is the LDO-less variant of the regular Moteino. It is clocked at 8Mhz, has different fuses to run the Brown Out at 1.8v and is designed for powering it from voltages less than 3.6V.
The differences to regular Moteino are:
- no LDO linear regulator
- the VIN and 3v3 pins are connected and can be considered the same
- must be powered from 3.6v or less when RFM radio and/or FLASH-MEM are installed onboard
- 16mhz resonator is still installed but not used with the 8Mhz fuses. This means you can still change the fuses yourself and use it if you'd like, but this will only be safe down to about 3V
- even more ultra low power - 2uA less current than the regular Moteino
- Very small size (1.3 x 0.9 inch)
- Breadboard friendly header layout allows you to attach female/male header pins on the top or bottom and make shields for it or just use it on the breadboard for prototyping
- FTDI programming header, we offer this FTDI Adapter board for programming of all non-USB Moteinos
- DualOptiboot bootloader for fast programming and no delay startup. Choose Arduino Uno/Moteino under Tools>Boards from Arduino IDE.
- Onboard LED on digital pin 9 (D9 / PB1)
- Now accepts the the following transceivers: RFM69HCW and RFM69CW, RFM92-RFM98 (LoRa), RFM12B (FSK):

What you get:
- No-transceiver (with HCW/CW/LoRa radio footprints): barebones Moteino 8Mhz that accepts RFM69HCW or RFM69CW and RFM92-98 transceivers, you can solder your own, or just use it as a standalone Arduino
- With transceiver: assembled Moteino with soldered transceiver, separate right-angle 1x6 0.1" male FTDI programming header, and separate pre-cut monopole wire antenna that matches frequency band of transceiver
- Side headers option: add two 13x0.1" male headers which you can solder above/below/sideways
- 4MBIT SPI Flash-MEM option: includes onboard SPI Flash chip, also available separately if you prefer to solder it yourself. This can be used for wireless programming or data logging. For more info see this link.
Transceiver reference (not all are pin compatible, see details above):
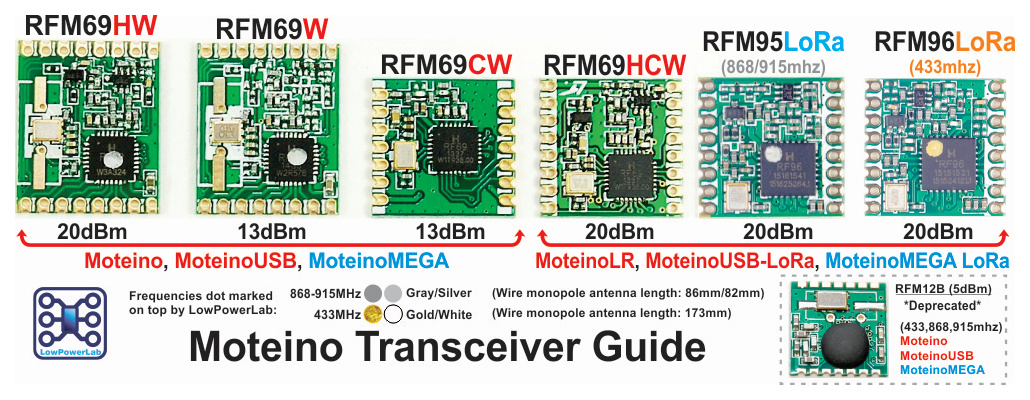
Compatible radios:
- RFM69HCW is a 20dBm transmit power transceiver, 130mA in TX, 16mA in RX. It's functionally (but not pin compatible) to RFM69HW. You will need to use the setHighPower() function after the initialize() function in the RFM69 library. See the examples that come with the library for how this is done.
- RFM69CW is a 13dBm transmit power transceiver, 45mA in TX, 16mA in RX. It's functionally (but not pin compatible) to RFM69W.
- RFM95/96 LoRa transceivers - 20dBm TX power, these can be used with the RadioHead library.
- NOTE: any RFM69 transceiver can communicate to any other RFM69 (regardless of pinout and variant). The RFM69Hxx radios (H = high power, 20dBm) require the setHighPower() function call after initialize.
- RFM12B is a 5dBm transmit power transceiver - given the pin compatiblity with RFM69CW this transceiver may also be soldered to a Moteino
915Mhz vs 868Mhz vs 433Mhz:
- 433Mhz theoretically has slightly better obstacle penetration (vs higher frequencies) but likely shorter range in open air. You might need an amateur radio license to operate these depending on how much you transmit and transmit signal power (13-20dBm), please verify in your own region.
- 433Mhz have longer antennas (see drawing)
- 868/915Mhz have shorter antennas, excellent performance when covering a typical residential property, highly recommended for new designs wherever possible, fewer restrictions than 433mhz
- there are no 868Mhz specific units offered, but will ship 915Mhz units for 868Mhz orders. Here is why: There is only 1 passive component value difference between the two versions and open air testing reveals no significant signal strength difference using 915Mhz units with 868Mhz settings.
- you are responsible to get and use the version that complies with your local/regional regulations in terms of ISM unlicensed frequency band and operation
- The RF behavior of Moteino is entirely dependent on the firmware you load on it, use it responsibly and abide with your local radio frequency laws and restrictions.
- Please be aware: not all frequencies are legal without a HAM license in all places. The library and example code may default to certain frequency/bitrate/output power settings, you are responsible to be compliant to your region's regulations.
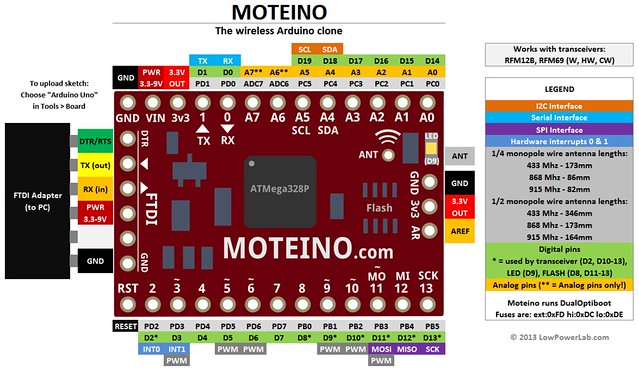
Pinout is the same as Moteino (except VIN and 3v3 are connected, and no LDO, and different fuses):
Programming guide
Click here for a more detailed guide.
You can upload a sketch to a Moteino just like you would normally do for any Arduino. In the Arduino programming environment you need to select "Arduino Uno" under Tools>Boards.
You will need a FTDI USB-serial adapter to connect to the FTDI header. Other compatible examples are: FTDI cable, FTDI friend, USB BUB, etc.
For all Moteino related blog entries click here.
For example code and RFM69 library click here, and Github libary and examples are here.
For example code and RFM12B library click here, and Github libary and examples are here.
Also check the LowPowerLab blog for updates and other projects.
Transceiver Datasheets
http://www.hoperf.com/upload/rf/RFM69W-V1.3.pdf
http://www.hoperf.com/upload/rf/RFM69HW-V1.3.pdf
http://www.hoperf.com/upload/rf/RFM95_96_97_98W.pdf
http://www.hoperf.com/upload/rf/rfm12b.pdf


 - Right Angle")

![RFM69W-433mhz [RETIRED]](https://lowpowerlab.com/shop/image/cache/data/HopeRF/RFM69W-500x375.jpg "RFM69W-433mhz [RETIRED]")
![RFM69HW-433Mhz [RETIRED]](https://lowpowerlab.com/shop/image/cache/data/HopeRF/RFM69HW-500x375.jpg "RFM69HW-433Mhz [RETIRED]")


![MightyHat [RETIRED]](https://lowpowerlab.com/shop/image/cache/data/MightyHat/DSC_8346_s-500x375.jpg "MightyHat [RETIRED]")
![BellMote Kit [RETIRED]](https://lowpowerlab.com/shop/image/cache/data/Moteino/BellMote/DSC_8162-500x375.jpg "BellMote Kit [RETIRED]")


")


")


")

")