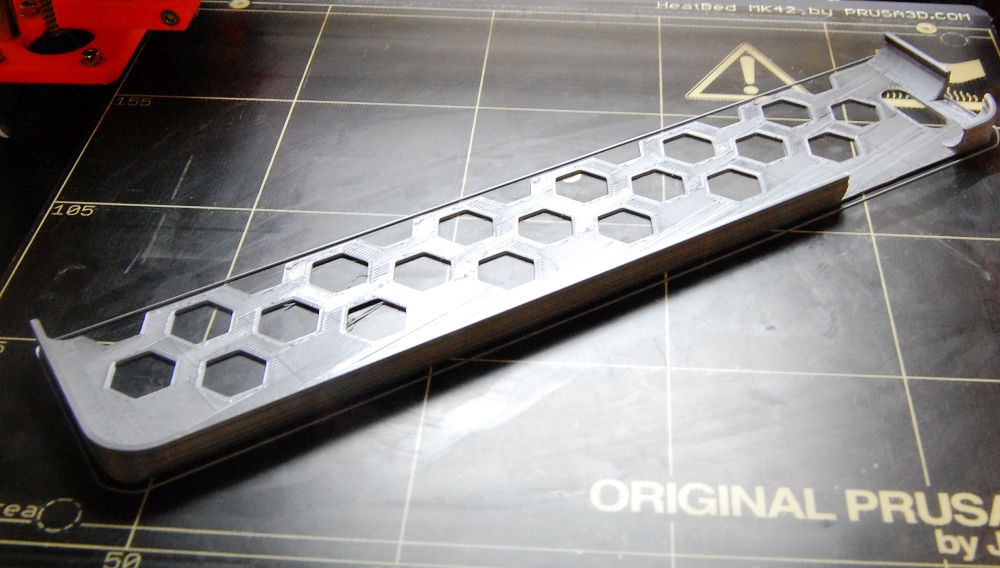
3D prints remover from scrap stencil

After you finally figure out the right settings and calibrate your 3D printer head and it makes prints that stick very well to your printer bed, it’s time to figure out how to remove the prints without damaging them. I went to HomeDepot to find a scraper but all are too thick and very rigid, and … $5+. I can do better.

There are many designs for a DIY print remover and most seem to be designed for razors. I see a few potential problems with razors:

  • too small
  • the utility knife blades are not flexible
  • if you’re not careful they can cut/damage:
    • the print bed if you’re not careful
    • you or loved ones 🙁

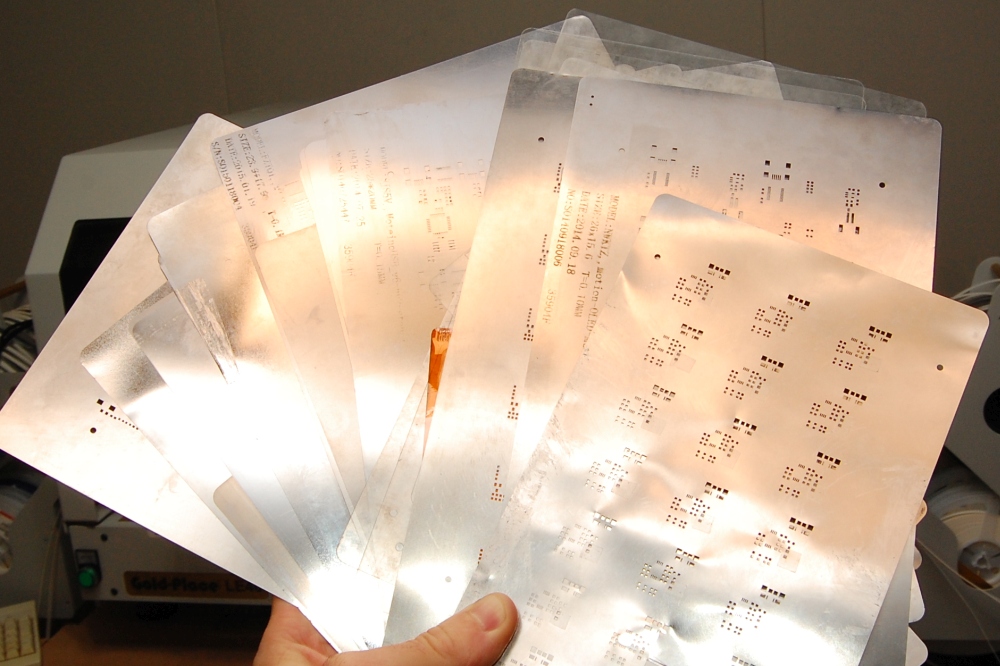
I have tons of old stainless steel stencils of various thicknesses, and all are very nice and flexible, perfectly thin to squeeze under a print and pry it off the bed.

I tried using one bare handed a few times and while its not as dangerous as a razor it’s still thin and if I try long and hard enough I will get injured. Sure you can dull it but I don’t like how short razors are, I wanted more of a proper scraper size. Continue reading

Moteino/production board testing – IDE vs. avrdude

To those that have concerned over the utility of my IDE add-on’s utility, I would like to follow up and give an example of production board batch testing at a very simple level. A simple pogo (spring loaded probe) jig is used to only power and access essential peripherals of a target board, and among other things upload a fixed test sketch to ensure basic functionality of the board. Since this is done repeatedly, it’s desirable to have a more automated way of doing this over and over again to save time. I show how we can edit some IDE settings for a target board to skip verification, and also how you can use avrdude to quickly upload sketches without the IDE’s compilation and optimizations overhead. The same would apply for bossa for SAMD or whatever upload tool your target board might be using). Let me know your thoughts and suggestions!

As an update – I’ve always just used avrdude for quick uploads but a very worthy mention suggested by a viewer is using avrdudeSS which is a very nice GUI for avrdude, check it out!

Component sourcing and Mouser vs. Digikey Pros and Cons

This post is about mainly sharing the experience of a small maker business sourcing genuine components right here in the USA. Sourcing and stocking the right components in the right quantities is one of the finest balancing acts in a small electronic manufacturing business. That’s because keeping large stocks of parts has not only tax implications but also drains funds from other efforts faster than you may realize. If you’re a beginner and need some tips, here’s some experience that might save you a little sweat and hopefully a few of your hard earned dollars. I might will update this article in the future as more things come to be realized in this area of the business.

My main parts suppliers since LowPowerLab‘s inception were Mouser and Digikey. Both are great in their ways which I outline down below, but there have been some surprising downside quirks as well. Hey it’s a little hard to get motivated to write only about awesome things, usually the bad stuff triggers reviews. But I’ll try to keep this objective and informative. If both were great at everything then there would be no reason for competition or even having multiple suppliers. Monopoly is a bad thing in supply chains, and I hope these companies will continue to exist as separate entities and not eat each other in some monster acquisition deal.


I have mainly 2 types of orders. One type is the “small value” prototyping batch of components or small run custom batch for a client which I usually place at Digikey due to their more comprehensive offering. Even this can run into the lower hundred dollar range depending on the project I’m putting together, but the average is under $100. Then there is my normal run, what I call the periodic replenishing orders which are in the thousands of dollars range. Whenever I run low on certain parts, I place them in the cart, and they stay there until I’m ready to complete the order. It’s unlikely for me to use fast shipping, so I usually go with ground services. I even use USPS for the real low count prototype orders.

Before I get into my sourcing experience with these suppliers, let’s take a quick look at the pretty incredible state of affairs with respect to passive component sourcing in Q1/2018. So as a quick primer side story about parts sourcing – if you’re a maker you’re already familiar with the astronomical passives lead-time situation. Just the other day I was scrambling to find 0.1uF 0603 caps (which along with 0603 1K 10K resistors are the most popular and numerous parts in my designs). They  nowhere to be found these days due to extreme factory lead times for new passive stocks. I ended up paying $210 this week for the last 15K reel of cheapest 0.1uF caps (normally <$20 for a 4K reel). Yup, it’s that bad!

Neither of these companies are directly at fault for this, at least not for the supply chain. But they control their dwindling stocks pricing of course that’s for sure, and why not make a buck while in this dire straits, right? This week I made the mistake of keeping some reels of basic passives in the cart for a day or so until I completed my order (at Digikey first then at Mouser when Digikey 1) doubled the price then 2) went from a comfortable 16-24,000 parts to 0 stock. No problem, Mouser doesn’t mess with pricing right? Then Mouser did it too, but too late for screenshots to prove it! I should have just bought those on the spot knowing everyone else is trying to buy them too. Don’t procrastinate silly!

Anyway let’s now go ahead and imagine a little fable here:

In general as companies (not necessarily these) get larger they tend to become more imperialistic, trusting their dominance on market share confidence and getting preferential with customers depending on their bottom line impact. Small customer care becomes secondary. Me and you are probably lost in the background noise of annoying small customers, more so the lower the order value (more overhead per order for less profit!). Say you bought a few different SMD resistors, some switches, whatever else small value components for your latest breadboard project.

You buy not-overnight shipping, place your order sometime in the morning and expect them shipped in cut tape or whatever part spec packaging, before the same-day shipping 8-9PM cutoff time, well in time to get it for your exciting weekend project you’ve been looking forward to. But hey wait – who cares about your $19 order value, when there’s real customers. Think someone will walk the warehouse 5 minutes to count and cut your 10x 0603 resistor tape then pack your $19 order by cutoff time just because your order came in early? Have a question or concern? Go away annoying fruit fly, we are having some difficulties fulfilling the unexpectedly large number of orders in the last day, we will get to your order after the real customers and our interests get served.

That fable is a little on the extreme. But it get’s pretty close to reality actually when it feels like it’s happening to you, again, then again, and again. Continue reading
Mailbox notifier 2 year service

My mailbox notifier stopped transmitting the other day. It lasted almost 2 years since the last charge, with last reading at 3.56V. This was based on an old MotionMote R1 and Moteino R4, plus a chinese 2000mAh Lithium Polymer battery.  This device reports MOTION when mailbox is opened, along with a calculated LastOpened-ago metric and battery readings. Makes my life easy knowing exactly when there is mail or someone just opens it. And I can get IPCam snapshots if I need to when motion is reported. All very convenient. Continue reading

New SwitchMote RECOM supply and sale!


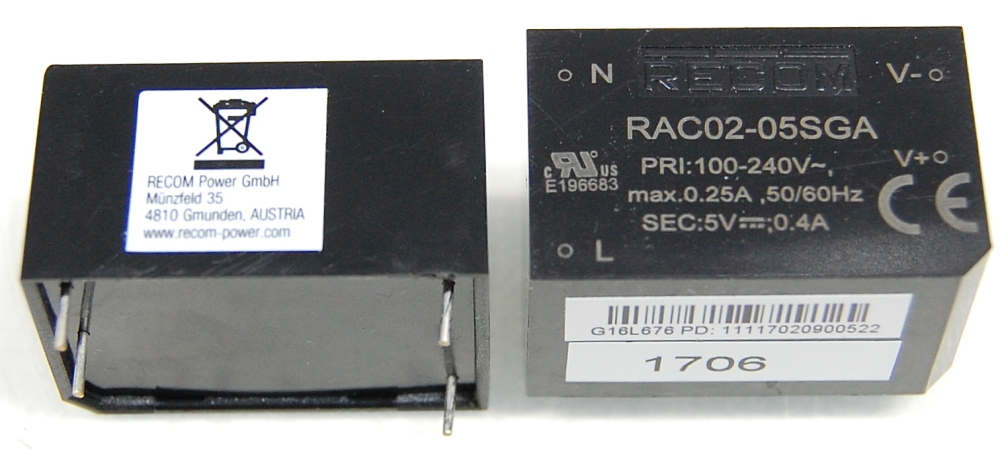
The RECOM certified PSU used in the wireless SwitchMotes was a pretty expensive part of the kit. This was sourced from Digikey/Mouser and used to cost around ~$11 in volume. There is now a new PSU with identical size and pinout, very similar specs but even more certifications, weighs less, lower noise, same Austrian quality. The really great part? It costs just ~$6.50 making the SwitchMote kits price go down!

The SwitchMote2x10A, SwitchMote1x30A and SwitchMotePSU kits are now on SALE, check them out!


Custom ArduinoIDE: Boards & Ports toolbar add-on

Have you ever done testing of lots of different boards with the Arduino IDE?
Were you frustrated with having to search your target board and port in the Tools>Boards submenu every time? Do this a few dozen times and you realize this is a major pain and time waste. Especially true if:

  • your boards menu is getting ever longer with every version and new package
  • with every new board there is a new serial port to select
  • you are in a hurry, make a wrong selection, get compile/upload errors, start selecting your board/port from scratch, face-palm!

I think if I add all the time I spent doing that in the past decade I could go on a short vacation in the carribean, wouldn’t that be nice!

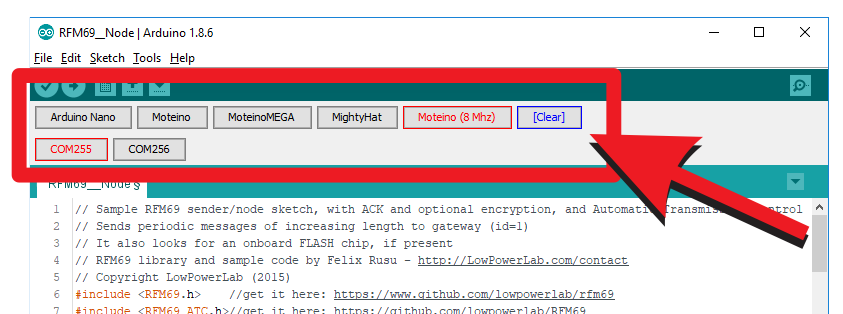
I spent some time dusting off my Java skills and understanding the Arduino IDE source code and made this little add-on toolbar:

Here’s a video overview of how this works:

Continue reading

Gateway app IP Camera snapshots

Wouldn’t it be cool to take a snapshot of your driveway when the garage is opening, or a snapshot of the mailbox when someone opens it, or a front door image when someone rings your door bell?

If you have an IP Camera on your home network, it most likely has an HTTP endpoint which can serve a static snapshot on demand.

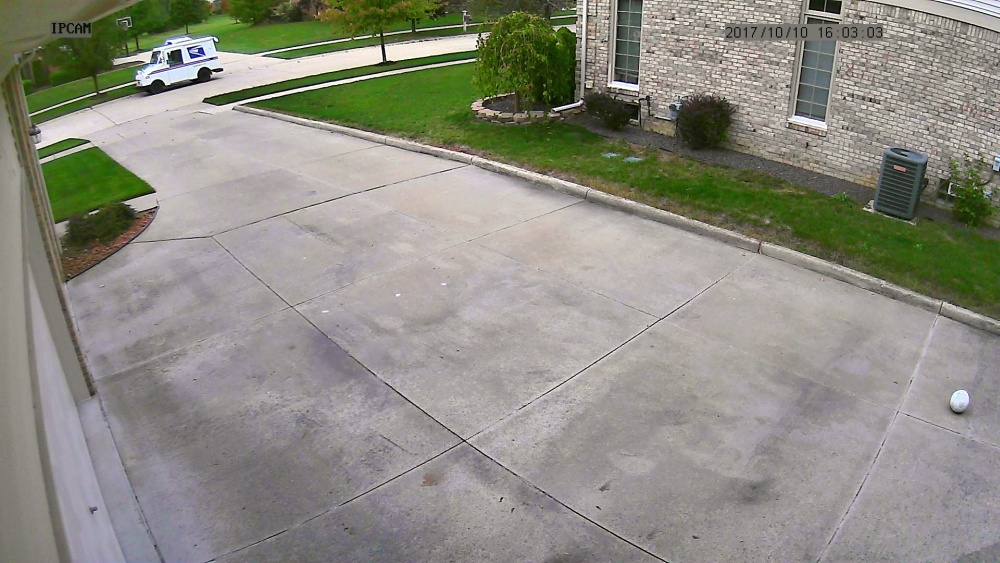
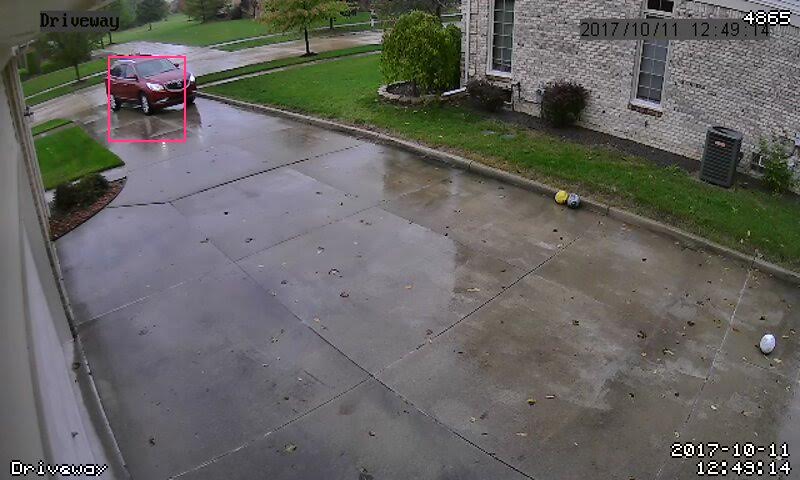
There is now support for a variety of such events in the Gateway app. I’ve added some examples for the doorbell when it RINGs, mailbox and motion motes when they report MOTION, and garage mote when it OPENs. The snapshots get attached to an email that is sent to yourself, so you instantly get an image of the event. Here is a sample email received when my mailbox (essentially a MotionMote) reports motion:

It’s the mail delivery so no issues:

In my case this camera mainly monitors the driveway, so I can have my GarageMote also send me an email when the garage is opened, here’s a sample:

This changeset includes a new setting called ipcam_snapURL that is overriden in the nodes which have such snapshot events. That way different nodes can request snapshots from different IP cameras. Otherwise the value is inherited from the general settings. If you merge this changeset locally, don’t forget to change the IP camera URL in the general settings, which should correspond to your IP camera’s snapshot URL – this should return an image, not a webpage or text/html page, or the attachment will be corrupted. Then, all nodes that override (ie inherit) this setting will display it in the node settings, where you can customize it for that node.

Here is a look at a sample mailbox node which includes the new event and URL setting:

And here’s the event and setting for the garage node:

You can mix and match to create other events based on the given samples. If you create your own variants, I recommend using the userMetrics folder to add new custom code, so the main app files remain unchanged and thus upgrading to new releases is easier in the future. Enjoy!

Introducing the no-LDO 8Mhz Moteino

From popular demand, there is now a Moteino 8Mhz variant which has the following differences to the regular Moteino:

  • no LDO linear regulator
  • the VIN and 3v3 pins are connected via a 0ohm resistor (including FTDI header VIN)
  • must be powered from 3.6v or less when RFM radio and/or FLASH-MEM are installed onboard, otherwise without radio/external flash the board will work up to 5V
  • 16mhz resonator is still installed but not used with the 8Mhz fuses. This means you can still change the fuses yourself and use it if you’d like, but this will only be safe down to about 3V
  • The fuses are: LOW: 0xD2, HI: 0xDC, EXTENDED: 0xFE
  • even more ultra low power – 2uA less current than the regular Moteino
  • Runs DualOptiboot compiled for 8mhz
  • 57600baud upload programming speed (vs. 115200)
  • you will need to install the latest Moteino definition (v1.3 or newer) in your Arduino IDE Board Manager to gain the new Moteino (8Mhz) target board:

For the latest updates and specs on this board, always check the official Moteino guide.

To program this Moteino the FTDI-Adapter offered in the shop can be modified to pass a safe 3.3V to the 8Mhz LDO-less Moteino – cut the *5V Output Voltage jumper and solder the 3.3V one:

Note that this mod will make the FTDI-Adapter regulate power, but it can only supply about 50mA to the Moteino, if you draw more power, the adapter might drop and reconnect to your computer

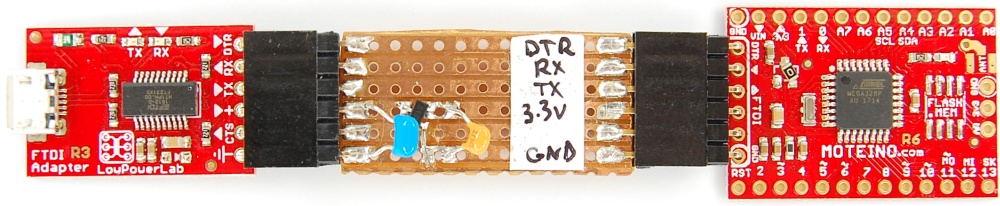
Alternatively, you can build a dedicated adapter that takes the 5V from the USB and regulates it to 3.3v, here’s such an example which uses the LDO from the Moteino itself (MCP1703) along with a 1uF and 0.1uF caps, all other connections are passed through and assumed to be 3.3v levels:

You would then use it in between your stock unmodified FTDI-Adapter (or equivalent board, providing 5V VIN power and 3.3V TX/RX/DTR signals), and the no-LDO Moteino which requires 3.3V when radio/flash are present:

These types of Moteinos are ideal for ultra low power coin cell and other micro power powered nodes – power them from 3.6V or less. Of course, when you have such tiny power supplies, you must choose your transceiver carefully, as you likely cannot transmit at full 20dBm power from a tiny coincell. The W/CW 13dBm radios running the auto-power-dial RFM69_ATC library extension would be recommended for running on coin cells or small solar cells.

I can’t wait to see what you guys will make with these!

WeatherShield + supercapacitor + tiny solar cell

There were some interesting discussions in the Low Power Techniques forum about solar power, running motes on super capacitors, and running motes without batteries. I had some tiny solar cells I got long ago from ebay, and I wondered if these could run a low power stock Moteino+WeatherShield node, without any assistance.

Update: the shop now has an offering for a 7.5F SuperCap and a 1W mini Solar Cell which can be used in a similar project as this shown here.

For the experiment I added this 7.5F low-ESR supercap to charge from the solar cell during the day, and keep the mote going at night. To avoid discharge I added a shottky diode from the cell to the cap. The solar cell is actually composed of three tiny cells wired in parallel, the combined capacity is around 0.7W. Here’s the “schematic”:

I initially charged the cap from a 5V source to get it going, and then I attached the cell to a basement blurred glass block window which hardly gets a ton of light:

Note that the shottky does drop 0.2V from the actual capacitor voltage. Even so this worked surprisingly well. Here is the new node in my Gateway UI:

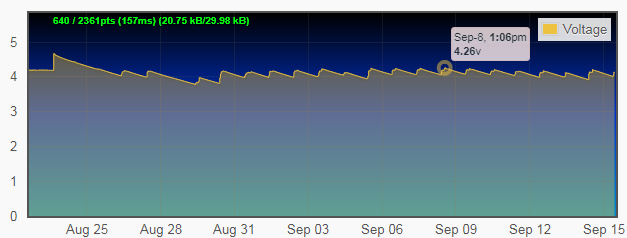
The node transmits temp/hum/pressure/voltage data every minute. Below is a look at a few weeks of the voltage readings. The solar cell charges every day to about 4.25v (actual voltage is ~4.45V b/c of the diode) and discharges to just below 4V.

Quite encouraging, I was pretty sure this would work since the WeatherShield and Moteino sleep at under 7uA, I just wasn’t sure how these old small cells would behave with the supercap. I recon if this node would be placed outside and facing direct sunlight, the charge voltage and overnight dips would be even higher values.

This would also work with a LiPo battery instead of the super cap. Of course, if this was placed outside in the freezing cold, those cheap LiPos from china can die in the cold. But at just $6.50, the supercap is a cheap alternative, much safer and resilient to the cold, and shows how low power is not that complicated.

Gateway app Updated to v8.10

The Pi Gateway software is now at v8.10, this release is mainly a new feature release and also it fixes some issues. You can view a list of all the changes in the official release notes. Here are some quick highlights:

Node/overridable Settings

If you’d like a particular global setting (from settings.json5) to be overridable in a node (for instance minimum voltage for battery powered nodes) you can now do so in metrics.js by using the new settings section under exports.motes, note that the included settings must match the name in settings.json5 or they will be ignored. Example from exports.motes.MotionMote:

imageThen on nodes of that type, the setting can now be set a custom value:
image

Wifi RadioThermostat CT50 IP setting support

Specific code for the CT50 was updated to support a new IP setting in the UI. This allows the user to override and set the IP of a thermostat on the node page, thus enabling having multiple thermostats with different IPs in the app:
image

New Setting Types

This enables more user friendly settings. Supported types are jQuery mobile HTML5 defaults, and examples of how to use these are found in the settings.json5 file:

  • checkbox – for true/false settings
  • number
  • email
  • password – obsoletes setting.password:true/false
  • range – min, max
  • default (no type) is text

A few examples using new types:
image

Email attachments

The sendEmail function in gateway.js has a new parameter where you can pass the URL of an attachment to include in sent emails: global.sendEmail = function(SUBJECT, BODY, **ATTACHMENTS**). Example email with attachment:
image

Scheduled events time remaining & datetime

Scheduled events now show time remaining until they will run, and the datetime when that happens:
image

Sunset/sunrise API for events

Based on suncalc, this node API allows creating events that run at various times during the day based on calculation of the sun position. A few examples are:

  • sunrise
  • sunset
  • solarNoon
  • goldenHour
  • dusk
  • dawn

To calculate these events, the latitude/longitude coordinates can be provided on the general settings page:

image

New All-Events page which shows all scheduled and disabled events:

image

Modified main menu:

  • removed the Exit item (redundant)
  • added app version:
    image

RSSI is now a metric and logged/graphed by default:

imageimage

Low Battery Voltage

Warning icon now blinks in/out over the node icon:
image

As always, when you update: