Gateway software update (v7)

The Moteino Framework Gateway software stack was updated to V7 and new sources are available at their Github repo, and also a new debian-wheezy image with the changes is released (for the image link see the Gateway image page). This release addresses some bugs and adds some significant refactoring and moving of directories. Most importantly the gateway application is now residing in /home/pi/gateway along with the public www directory for ease and more consistency (previously in /home/pi/moteino). Here are the other changes that go with this:

  • the www directory is moved from /var/www/default to /home/pi/gateway/www
  • the .htpasswd file and ssl certificate files are now in /home/pi/gateway/data/secure
  • the database files and log data are now kept in /home/pi/gateway/data/db
  • nconf is used to manage the settings file (previously known as settings.js, it was using straight nodejs exports to import the settings) which is now named settings.json5 and is a JSON5 based (via json5 package) settings file which can be manually edited as well as maintained through the app (in a future release)
  • there is a new package.json file which includes all the node dependencies. If you’re inclined to manually install the software stack, now all you have to do is cd /home/pi/gateway and npm install to get all these dependencies installed
  • the nedb power-loss database purging bug is fixed with a new nedb 1.5 upgrade
  • all server configuration files are updated to reflect the new paths
  • other misc minor changes and optimizations

As usual, if you detect any bugs in this release please let me know asap. Enjoy!

New products!

I am quite happy to announce a few new products (or new revisions), some of which people have been asking for a long time, now finally available at the shop!
First there is the IOShield which is now available as an assembled PCB with optional “24VAC input package” which allows you to place it in places where you have 24VAC input, like I did in the wireless sprinkler controller project.

Then there is a small BellMote run with OSHPark purple PCBs. Completely automate your doorbell with this kit which allows you to detect, trigger, and disable your doorbell, all wirelessly via Moteino gateway.

Next up is the SonarMote which finally has a new revision (R2) which addresses some bugs, has a simpler BOM and is even lower power – just 10uA average when the Moteino is properly slept – sample sketches here. A wide range of applications are possible, from parking sensor, inventory control, sump pump monitor, and others.

Finally we have the MiniBoost which is a small SIP form boost regulator that yields 5V from an input voltage of 2-4V. Up to about 1A is possible from a charged LiPo battery (4V) and will easily carry a moderate load like a RaspberryPi. It uses the same boost regulator as the MightyBoost but the SIP size makes it very versatile for breadboard projects. It’s perfect for projects where you have a main working voltage of 3.3V but you have some sensor that needs a hefty 5V source. Comes with onboard green power LED. It has is the same pinout and size as the legendary 7805 regulators:

It takes a long time to go through prototype stages and then manufacture electronics of high quality, all as a small operation like I have. I hope to get more time to put more documentation and assembly instructions together for these kits and boards. Some of them have already been introduced as prototypes and have a fair amount of information available. There are also other things I’d like to blog about, just not enough time, stay tuned for more!

Gateway software update (v6)

The Moteino Framework Gateway software stack was updated and new sources are available at their Github repo, and also a new image with the changes is released (for the image link see the Gateway image page). Let’s call this v6, since it’s the 6th gateway image I’m releasing. This release addresses some bugs and adds some new features:

  • Added ability to make HTTP requests from a node using the node request module. This means you could include controls that trigger a request to some IP in the LAN/WAN and does something. This is really cool because it means we can have non-Moteino based nodes that speak HTTP instead of RF, like commercial wifi thermostats. Which leads to …drum roll
  • …the addition of a specific type of open API wifi thermostat (Radio Thermostat CT50) that allows full control of HVAC equipment. I will review it and blog about this addition whenever I get some time. Also added a new node type and icon for the water meter:
    Gateway_ThermostatWaterMeterIcons
  • adding (injecting) a non-moteino node (ex for the thermostat I mentioned above) to the gateway nodes collection can now be done as easily as this (in the terminal screen, type a new node ID and “NEW” in the msg box, click SEND):
    Gateway_NodeInject
  • Graph auto scaling, requested and discussed in this forum topic. The yaxis scale will automatically scale depending on the data viewed, very useful for highly variable or granular metrics, see the thread for screenshots of before/after and specific code changes to allow this.
  • fixed a bug in the new log storage engine where negative data was stored as unsigned 32bit integers, thus being extracted as positive. Negative data should now be welcome.
  • don’t allow graph live incoming data values when the graph was panned/zommed into a specific region
  • migrated from sliders to top bar toggle buttons for node-visibility, metric-pinning, enable-graph. Sliders were a pain to work with.
    Gateway_pinnedGraphed
  • lots of other refactoring and optimizations especially in the metrics.js and UI areas

I hope you enjoy the new release.

Sprinkler Controller Automation

Another node type is now available on the Gateway automation interface: a sprinkler controller. This is achievable through a board I designed to be able to control many outputs. I call this board IOShield and it features two 74HC595 serial to parallel shift registers.The IOShields are daisy chainable and can take 24VAC through a buck regulator. Wireless control is done with a regular Moteino or MoteinoUSB and in a daisy chain only the first board would need the regulator and Moteino. These are now available in the web shop. See the overview video and details/code below.

I had an old sprinkler controller which worked just fine. But I had a few things I could be improved:

  • The programming interface was not really intuitive, definitely not user friendly
  • Every spring when it needs adjustment or sprinklers tested and fixes, it’s a pain to turn it on manually and then run in the far end of the yard to check/fix a sprinkler
  • Water is expensive and Michigan weather is unpredictable. I need a finer control of the sprinklers and the ease of turning programs or zones ON/OFF remotely, or when I’m away from home

I took apart the sprinkler controller to figure out how it works. There are 2 boards, one hosts the 24VAC TRIACs and circuitry that powers the solenoids. The other was a controller board with user interface, LCD, buttons etc. This gets power from the first board and controls the TRIACs through a ribbon cable. A quick continuity test reveals the pins of the ribbon connector control the gates of the TRIACs, simple enough.

So I designed the IOShield to be able to take the same 24VAC input and power the Moteino and itself. I have 9 sprinkler zones, but one IOShield will support up to 16 outputs. I can use the TRIAC board and only tap into the 9 zones that are active. I can just use the first board with all the TRIACs and then replace the clunky standalone sprinkler controller board with the IOShield+Moteino combo for completely wireless control and integration to the Gateway. If you have a similar older controller you may be able to do a similar setup with otherwise minimal changes to your sprinkler system. Here’s the hacked controller and control from the Gateway UI:

The RFM69 IOShield example skech for sprinkler control has been posted at Github.

The latest Gateway metric definitions also contain the definition for the sprinkler node, just plug it in and it should pop right on the interface. Sample zones and events have been defined as well, you can easily define your own or make your own schedules in metrics.js. Graphing will show you which zone ran, for how long etc. Enjoy!

SonarMote kits available

I have a limited offering of SonarMote kits. These are great for sump pump monitoring or parking aid (have a long car and a short garage?). Lots of people asked me to put these up, now the’re finally there. See the SonarMote page for more details/code and other project ideas, I will continue to add documentation there. The 1/16″ lasercut acrylic case plans and sample sketches are posted here. They work with 3.7v LiPo batteries which will recharge via the USB connector and they are also programmable via USB serial (FTDI onboard the PCB). They require a Moteino (no radio for projects like parking air or visual/audio feedback distance trackers, or with radio for things like the sump pump). It plugs right into the Gateway Framework and will start monitoring and logging distance as soon as you turn it on:

Gateway_SonarMoteSUMP_Graph2

I love my standalone parking aid sensor based on SonarMote, it will light up the RGB LED green – yellow – then blink red faster and faster as you approach a set limit. When battery is low it blinks blue (every couple months or so on a small LiPo, recharge it via USB). Here are some action photos, also shown with an optional OLED display which plugs right into the SonarMote.

Unfortunately I cannot include LiPo batteries at this time because of the over complicated logistics and restrictions of shipping batteries. Most places online probably are breaking the rules when they ship you more than 2 batteries of certain capacities (by air) … but let them do it, sorry about that.

DoorBell Mote regulator update

The last BellMote prototype ended up having 2 LDO linear regulators, 12V and 3.3V feeding from the 12v one. I was split on using LDOs going forward. The upside is they are cheap, even 2 of them are under $2. The downside is they are inefficient and run warm/hot depending on the load. I could have gone with a single 5V LM7805 which will run even warmer, the higher the gap between Vin and Vout.

Digikey-ing around, I found these two switching regulators that are drop in SIP replacements for any LM78xx series LDOs: a RECOM 0.5A output with 7-28v input range ($2.8), and a Murata 1.5A 7-36v input range ($4.25). I tried both, and below are the results:

I won’t repeat the captions here but the clear winner is the Murata (plenty stocks at Digikey) it’s quite a bargain given the advantages. I tested it on 24VAC as well and it does not heat up at all either so it will be perfect for some coming interesting projects I have in the works that will feed on 24VAC. The RECOM regulator is just $2.8, still good enough for 16VAC but I prefer the Murata for further 16-24VAC powered projects. That said, I will offer these for sale (2 of them, one RECOM, one Murata, and I will replace the LDOs with a Murata and keep the third one). I may make a kit of this, not sure yet. For now you can grab these two from the first prototype batch, they will be worth millions when LowPowerLab is like Apple and me like Steve Wozniak 30 years from now (-:

Cooling on the cheap: attic fan tests

For some time I wondered if there’s a way to move the cool air in the basement upstairs and make that living space a bit more bearable without running the AC all day long when everyone is gone. As soon as the sun rises and starts hitting the roof in the morning, the attic temps start to blast up towards 150° at the peak around 6pm. The side walls and windows also heat up, act as heat radiators and contribute to warming the interior spaces. Once that attic space and side walls are super heated after a day-long sun blast it’s very hard to cool the interior back down, while heat radiates quickly inside and fights the HVAC’s cooling efforts. The attic 20″ blown insulation does a great job keeping the 2nd level way cooler than the attic, around 87°F, but still feels very toasty, and the decade old HVAC runs almost non stop from 4pm into 11pm to make it bearable enough to go to sleep. All this while the basement temps range from 65-75°F during the day, nice and cool.

Googling around I found some solutions that involve using the HVAC fan to push air from the basement or lowest point in the house all the way upstairs and into the attic (opening the attic hatch). Attics have vents that allow air to flow through and out. So this air movement pushes cool air through the house and into the attic and then outside through those attic vents, thus keeping the attic air from super heating. The outcome is that the HVAC AC will have an easier time to cool down the home in the afternoons, running for less time while the temps bounce less throughout the cooling cycles. Unfortunately running the HVAC fan also requires a vent to be cut into the basement HVAC pipe system so the cooler air can be pulled by the fan and moved up, rather than the air from the return pipes (which brings it from upstairs). I don’t really want to do that, since the HVAC fan is a big heavy 220V inefficient motor.

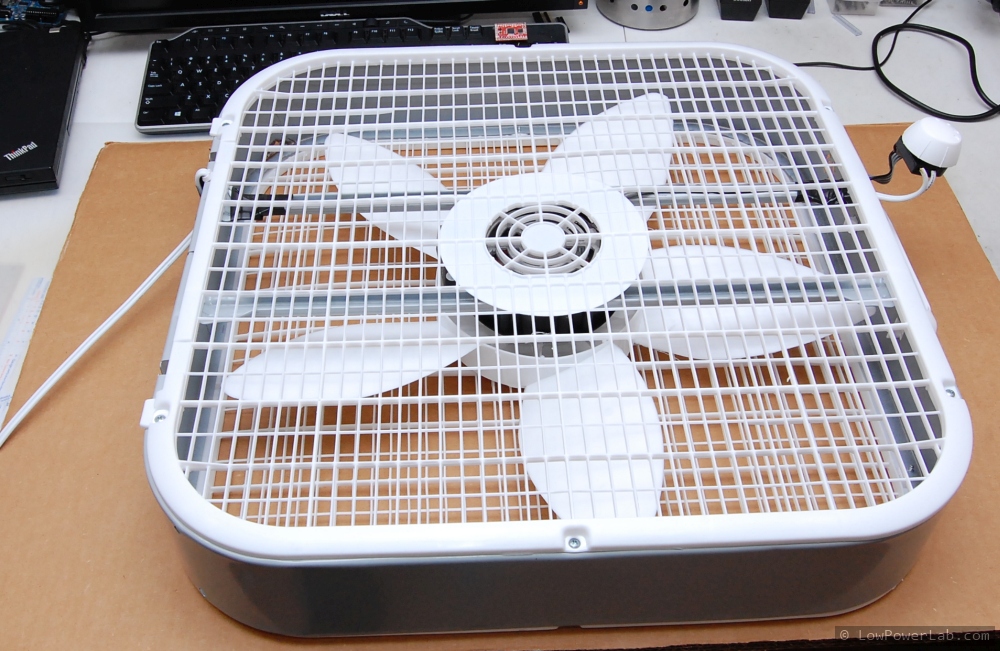
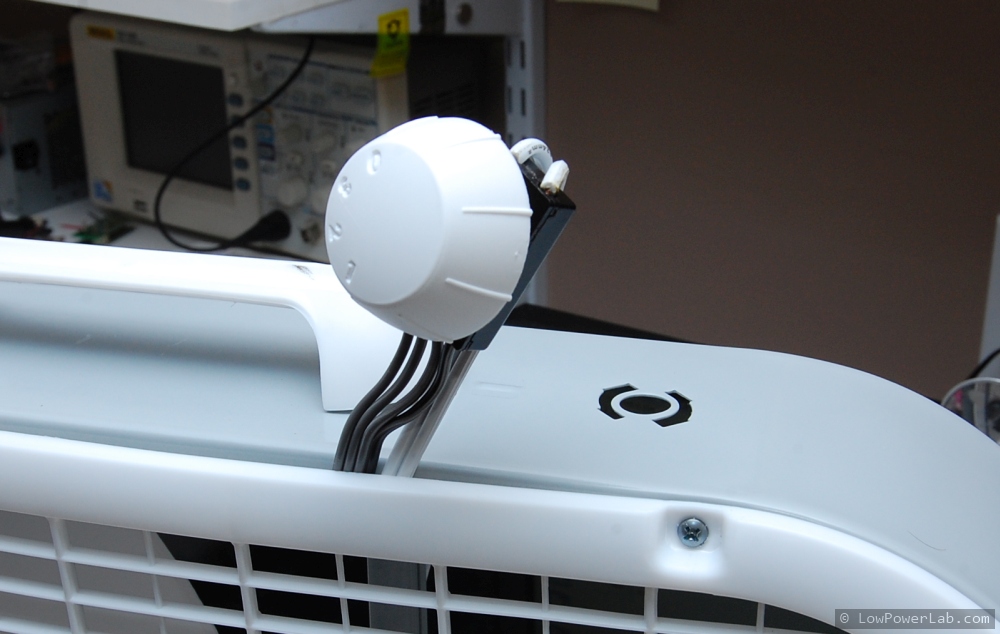
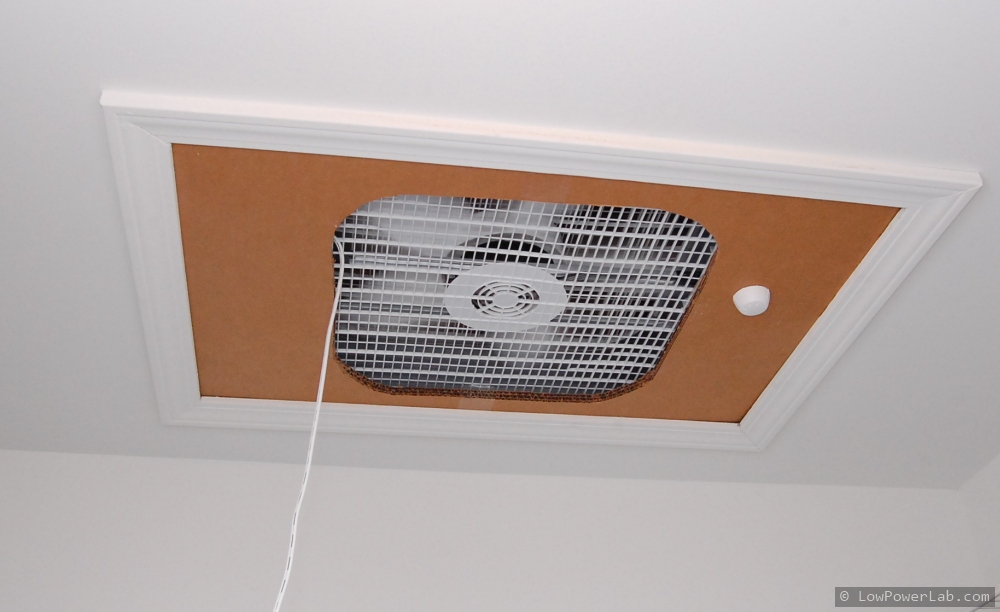
So I’ve just started playing around with some WeatherShields and a cheap Lasko box fan ($17 from HD) that I’ve installed on a thick cardboard cutout which replaces the attic hatch. The fan is good enough for proof of concept and allows easy hacking of the speed knob displacement into the cardboard so I could change speeds from inside the home without climbing on a ladder all the time. For now the power is provided through an extension cable until tests are done, then I plan on making a SwitchMote controlled power outlet in the attic where the fan can plug in, so this could be turned ON/OFF automatically by the Gateway.

Here are a few photos of the fan mod and install. This is just a temporary fitting for some basic tests. A final install would have the fan attached more securely with no air gaps etc.:

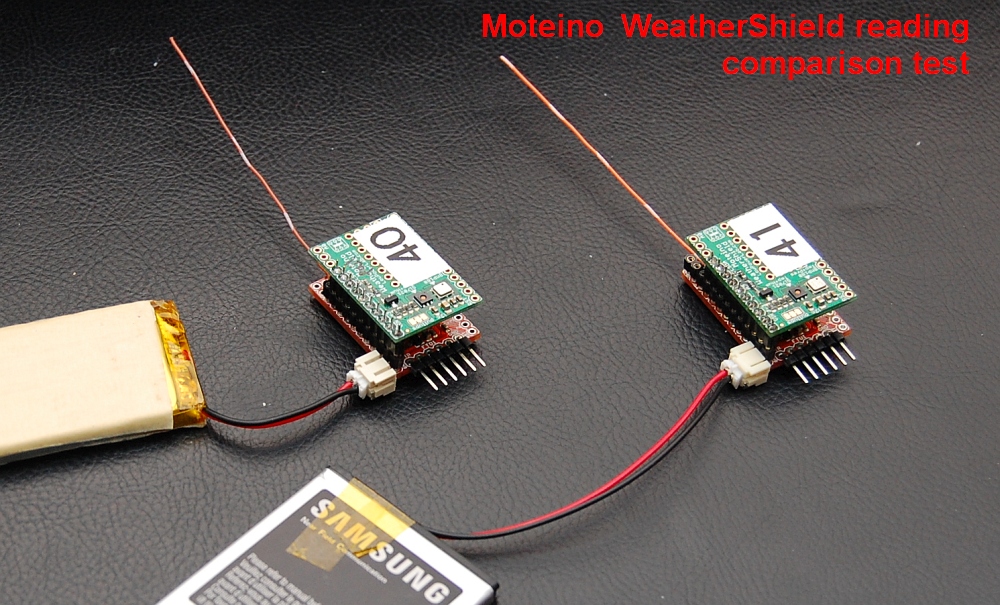
I put together 2 WeatherShields for this test, and added a dedicated Weather node to the gateway. This was a good way to test WeatherShield readings side by side. Results are impressive, I could not see the temp and humidity readings be more than 1% off from each other. BTW I’ve added the new Weather node icon and node definition on the Gateway github repo, and I’ve posted the low power sketch I used on these weather nodes.

Basic fan test data & conclusions

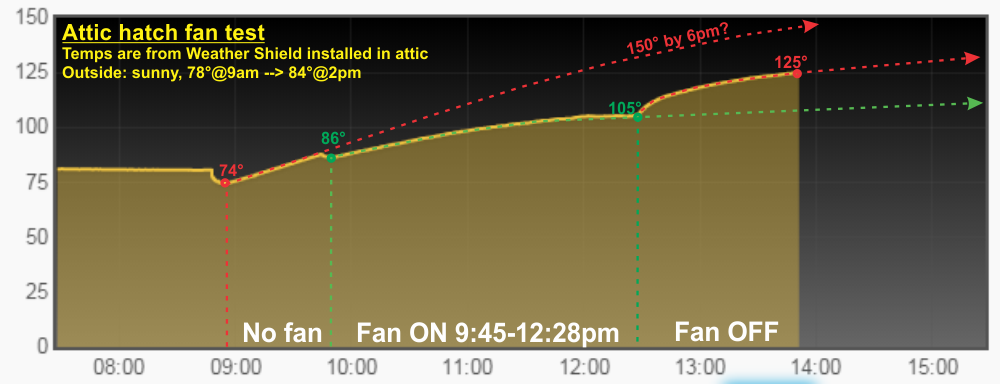
Each level is ~1500sqft, with the attic having a steep slope, so a large air volume. I’ve put one weather sensor node on the second level and the other in the attic. I started measurements around 8:45am when the sun was starting to heat up the attic. One hour later I started the fan and let it run until 12:28pm, almost 4 hours. An open window in the basement (or 1st level) allows air to flow easily and not stress the fan. Here’s a glance of the temperature data from the attic sensor, explanations below:

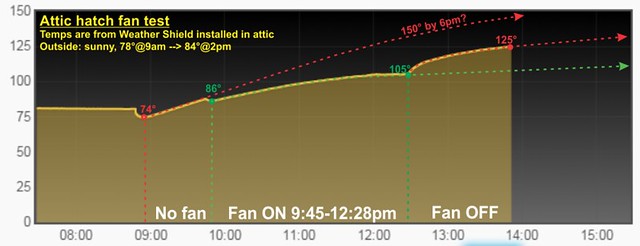
Just looking at it it’s obvious the fan made a big dent. I ran it at max speed which is pretty loud but this is in a closet so that helps contain the fan noise. I’ve seen more expensive similar fans  advertised as very quiet. The point here is to move as much air as possible since the fan would run during the day anyway, when nobody is upstairs to hear the fan noise. I’ve made some projections of what I think would happen if I ran the fan all day or if there was no fan at all.

I will continue to make measurements on comparable days with and without the fan and perhaps update this post, but I think the test is a success. It was a sunny day with 85° tops. If the attic normally heats up to around 140-150° at peak and the 2nd level is around 90° it is very difficult to cool it back down and the AC works very hard. If the fan can reduce the attic temperature by even 20° I assume the AC would not need to work as long and hard to cool the upstairs in the afternoons. I think this simple fan will cost much less to run for 8-10 hours, than running the AC that much harder all afternoon.

A possible improvement to this method is to install more fans in the attic, on top of the vent exhausts to help remove that hot air from the attic, more complex. Or cut a hole in the basement door to add another fan to push air, messy and not wife-friendly. Or stack another fan on the existing one at the attic hatch to increase CFM, just another $17.

To automate and remote control the fan I will need to make a SwitchMote outlet and put it in the attic. That’s for another post.
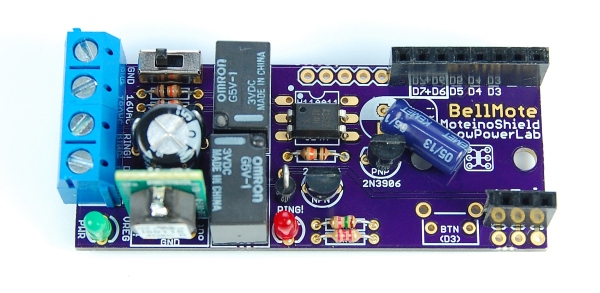


More Awesome DoorBell Control


UPDATE: I eventually decided to use a single switching regulator that I found on digikey which is both awesome and well priced. See this blog post update about it.

My first DoorBell Mote prototype was working nicely and it allowed monitoring the door bell (while also triggering it remotely – toddlers love it). But I wanted more. On weekends the family likes to get a well deserved nap during the day and often those pesky solicitors ring the bell and wake everyone up. So naturally the doorbell has to be disabled also, without major effort or any disconnected wires. Sounds like the perfect addition to the Door Bell Mote. So I made a new revision and a proper PCB for this, below is the schematic with the changes and the proto PCB from OSHPark. Actually I made more changes to the schematic after putting together the PCB, so there are some differences. I’ve tried a LTV814H optocoupler for AC detection instead of the more expensive H11AA11, it works just as well, but both can be used on this PCB:

bellmote_schematic

There are 2 regulators on this PCB. One is a 12V linear LM7812. The second is a 3.3V linear regulator getting input from the 12V LM output, both in TO220 packages. I know they are super inefficient to convert rectified 16VAC to DC voltages and the critics will stone me for doing this. But here’s the deal – the linears are about 50cents each and I had both among my junk parts. An efficient switching regulator is somewhere between $5-$10. The linears run somewhat warm. The 3.3V regulator only gets warm when I use the disable relay. So they can get warm but not hot, which is fine by me, it’s just a tradeoff. I might make a new revision where I have a single switching regulator such as this one, a drop in replacement for the LM linear regs. Continue reading

Gateway Source Code Released

A few weeks went by since I blogged about the new Gateway interface. I managed to get the code ready and I posted the links on the dedicated gateway page where I prepared a guide to install the stack needed to support it (this will be improved). The code itself and sources are published at Github. There you will find the old interface sample I had posted a long time ago (in the OLD subdirectory, kept there for reference); the files are replaced with the new interface files.

There are 2 directories where you will need to copy files from here after you’ve completed the setup of your Pi from this guide (I may release a Pi image that has everything setup and ready to go). Please note: when you download stuff from Github you must use the Download Zip button in the repository rather than downloading individual files.
First there is the /var/www /default directory, you should copy these files there:

Second there is the /home/pi/moteino directory, you should copy these files there:

Once the gateway starts running it will create the databases for you and start logging data as it comes in from your remote nodes through the gateway Moteino attached to your Pi’s serial port configured in the gateway.js script.

This post is not meant to replace the guide found at the lowpowerlab.com/gateway page. I will post further details there. I created a new forum for discussing this and other gateway related topics so please post your questions there.

Gateway Dashboard Overview

I’ve been talking about a new gateway interface for a while in the forum. I will release more details and the source code soon. Here’s an overview that I’ve put together the past week,  and some screenshots below with graphs and other available features:

Here are some more screenshots:

MAILBOX_DSC_7214DOORBELL_DSC_7220
MOTION_DETAILSMOTION
SWITCHMOTE_DETAILSWITCHMOTE_GRAPH
GARAGE_DETAILGARAGE_GRAPH
DOORBELL_DETAILSDOORBELL_GRAPH
WATER_GRAPHSUMP_Graph2

This content will be updated and improved on the dedicated Moteino Gateway page where all the source code and details will be published.