
For a few weeks I kept tweaking and playing around with my new mailbox event notifier, based on Moteino. It all started as a joke, then when I saw it actually works, I decided to beef it up and do a writeup and a video:
UPDATED hardware for this project: I modified the circuit and added an enclosure and battery voltage readings. Also a standalone LCD receiver. More details here. The rest of this post is for reference only, you should follow the details in the new post.
UPDATED Schematic: For stability you should add a 10K pull-up resistor between the OUTPUT and POWER pins of the hall effect sensor. I omitted that in the video and added that later. Also a battery POWER switch is very helpful. You should always disconnect POWER from the battery when you try to load the program to Moteino using your FTDI adapter!
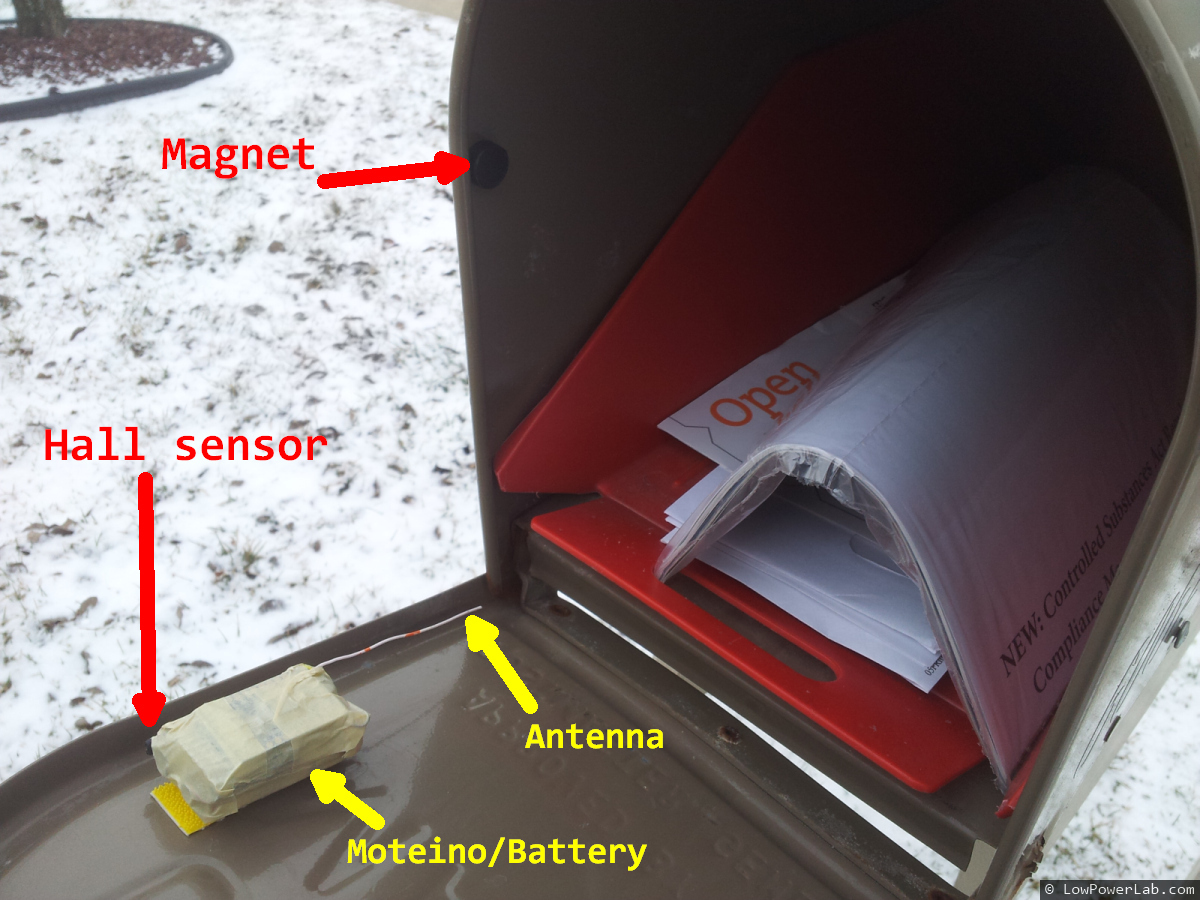
The details are simple. A hall effect sensor detects a magnetic field from an earth magnet. The earth magnet is placed inside the mailbox, while the Moteino/sensor/battery pack sits on the door. When the door is opened, the magnetic field is interrupted, the sensor flips state and the Moteino sends a “DOOR OPEN” message, or “DOOR CLOSED” when it’s closed.
The hall sensor uses ~2.5mA of power which is a lot for low power battery operation. So I added a 2N3904 NPN transistor (driven from a digital pin through a 2K resistor) to switch the sensor off when it’s not being used. When I need to read the hall sensor, I just turn on the transistor, read the sensor value, then turn it back off. That brings the total power consumption down to to an average of about 60uA, so the 9V battery should last a long time. To save power overall, the Moteino “sleeps” most of the time and only checks for events every 250ms using an interrupt timer. Every ~5s it reports when the mailbox door was last opened and last closed. This way I can distinguish between these 2 events and tell if the door was left open , or if someone else is messing with my mailbox.
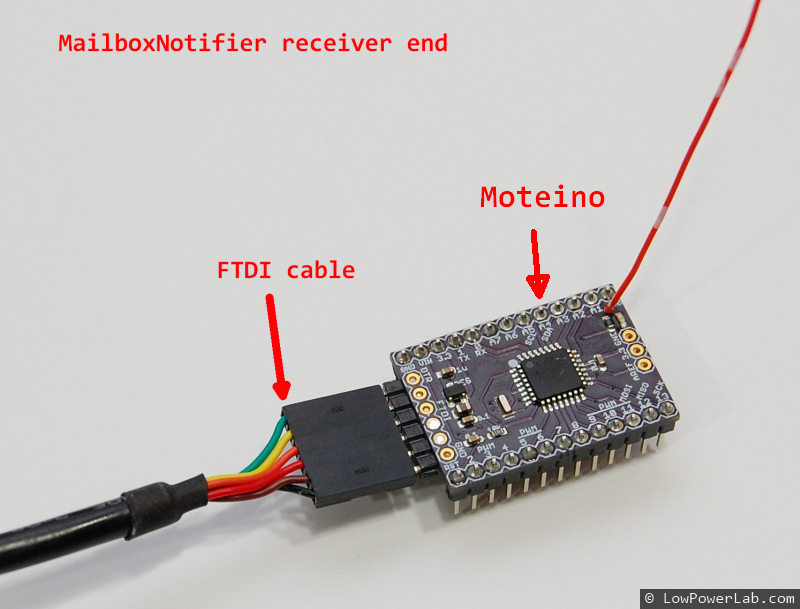
The receiver simply runs my RFM12B receiver sketch. It passes incomming messages through to the serial output. I can capture that on a PC or a RaspberryPi, running a python script which sends me an email or SMS message when a DOOR-OPEN message is received. This works great. To send an SMS, I simply send an email to my cell carrier sms mailbox, in my case that is number@txt.att.net
The python code to send an email/sms from python, and the arduino sketches that run on the sensor side and receiver are in my GitHub repository.


I would think that device as pictured would be hard pressed to last a season or was that not masking tape I saw? The tape not only dries out and becomes extremely brittle as well as a surface to help condensation to form on the PCB which can lead to a shortened battery life.. One last thought, I Hope that isn’t a metal mailbox… I’ve used them as shielded enclosures with some finger-stock for the flap ground seal.
Bob
I realized… too late that my last post was more than a little unkind. I thought it a great proof of concept, once I thought about it rather than my first impression which seemed to endorse a shaky design, If exactly replicated.
Bob
The tape wrapping was the first trial. I would normally put it in some kind of enclosure. I have an enclosure in mind, but too little time to dedicate to enclosure making. I have to make some time to go to Techshop Detroit to play with the laser machines…
It is a metal mailbox. I had to make a little hole for the antenna to poke out and get the signal diagonally across the street and into my basement lab, otherwise the metal enclosure acts as an RF shield.
Just curious; why didn’t you mount the magnet on the door and the board in the mailbox (ie. so it doesn’t move)?
Very good question, was wondering how long before someone notices 🙂
It’s mainly because my mailbox has a mobile plastic container (red). The mailman often pulls that out to put stuff in and it would interfere with the sensor being on the side of the mailbox enclosure, unless I put the sensor towards the top of my mailbox which is round. Also, some packages have unusual shape and may disturb the sensor or jerk it off the velcro. So putting the sensor near the enclosure opening is probably not the best idea, unless you wire the sensor with long wires and then leave the bulk (moteino, battery) in the back of the mailbox and only wire the sensor itself (which is very small) near the mailbox opening.
This wouldn’t be a problem but I couldn’t find an easy way (yet) to position the magnet on the door and mate it with the sensor inside. As you may know, the hall sensor only triggers when the North pole of the magnet is aligned with one of it’s axis (perpendicular to the sensor front face). Hence I would have to go out of my way to expose the hall sensor in a weird way. I may look into this later, but for now it works just fine.
This way the whole sensor is nicely wrapped in tape, a solid piece, and I like it that way. I can move the magnet easily if it needs realignment.
How hard would it be to add battery sensing in this build. Even if you say “the battery will work for a long time” it would still be awesome to get notification when the battery is running low and you can go change it. 🙂
I haven’t thought of that. Moteino works at 3.3v. The battery is 9V. So even if in time the voltage drops there’s still a long way down to 3.3v. Even if it drops below that it will still work down to around 2.7V actually, even though that is way out of Atmel spec for 16Mhz. The rate of voltage dropping slows down in time also. So I expect the 9v battery to last several months if not more. It’s still at 8v after a month.
A blog post with tips to maximize battery life would be great! 🙂
I will try to put together a more comprehensive documentation for Moteino. It is basically an Arduino clone, so if you can do something with Arduino, you can with Moteino as well, and on top of that you can transmit wirelessly 🙂
I posted example code in github and in some of the blog entries, some of which contain low power code.
Also here’s a great starting place to put Arduino/Moteino to sleep and save power: http://www.rocketscream.com/blog/2011/07/04/lightweight-low-power-arduino-library/
Also see my coin cell battery posting.
Keep en eye on the blog, I plan to add more info. Thanks!
By the way, even if the voltage is above what you need, batteries have a cutoff voltage where they can no longer supply current.
That cutoff voltage varies with temperature and current draw, but it’s well above 3.3v. My estimate would be that it’s around 7.2 for the 9v battery (9v = 6*1.5v (charge voltage for AAs). 7.2 = 6*1.2v (cutoff voltage for AAs)
Oh I also was planning on doing something similar to this for my parents who have mailbox so that they can’t see it from their house. Now I have a nice reference build, thanks 😉
Great Job ! Sorry for my english (french speaker) and my beginner question. Is not more (power) economical to put the atmega in sleep mode and use a wake-up on a int with a simple switch instead of a hall effect sensor ?
Right, but in that case you would have to keep the hall effect sensor powered ON 100% of the time for it to trigger an interrupt, killing your battery within days.
No, I think I didn’t explain well my point of view. Only a Monteno+Transmiter and a mechanical switch (without hall sensor). The monteno is put in sleep mode, and wake-up(ed) with the switch (when the door is openned), like in http://donalmorrissey.blogspot.ch/2010/04/putting-arduino-diecimila-to-sleep.html
Oh mechanical switch … that would work. But you would have to have a wire attached to the switch between the door and mailbox, correct?
I opted for a non-contact solution since I had a hall sensor.
Unless you fix the switch on the door, next to your montero. But your solution is elegant… and mor geek 🙂
Great Idea, I tried something similar, only I used one of those wireless doorbell from ebay and a reed switch connected to the door bell button, when the mail box was opened it would trigger the reed switch as it opened announce it inside the house.
Next step would be to an arduino with a light sensor taped to the receiver led and send me an alert.
Any idea what kind of range this would have? My mailbox is about 450 feet from the house.
The 434Mhz has a tested open air range of about 50-70m (150-200ft), max TX power. The 915Mhz version has a tested open air range of about 130-150m (400-450ft). Indoors they behave very similarly.
My RFM12B library supports different air-transmission data rates, so lowering that number might help increase the range a little bit.
As soon as you add obstacles (any metal, walls, brick etc) the range goes down significantly. That being said, my 915Mhz node sits in the mailbox (with antenna outsite) across the street and diagonally, and goes through a concrete/brick wall below grade into my basement. The distance is about 130-150ft. You could have an intermediary node to act as a router … but 450ft is a little out of range of these RFM12Bs.
I am planning to add more powerful radios to Moteino. Keep an eye on the blog for updates.
My mailman would prob call the police and the bomb squad would be called out…..
Umm…that’s unfortunate. Perhaps your mailman is not what I would classify as extremely intelligent..?
Anyhow maybe the bombsquad would learn something new – what does not look like a bomb.
I made a wired version of this – (I had a huge spool of coax that I had no other use for). I ran the cable under the driveway just before the concrete was poured, so I had very little digging to do. The door sensor is a Light Dependent Resistor. The sensor is mounted on the inside back of the mailbox and points toward the door. when the mail carrier comes, the ambient light is enough for the sensor to detect. The rest of the electronics are inside the house, so no outdoor batteries! The only possible shortcoming is that opening the mailbox in the dark of night won’t alert you of the event (actually this could be seen as a positive)
That’s a great alternative, if you can afford to run the wire.
I also thought about using a light sensor, however if it’s dark it won’t work, also if someone is opening my mailbox at night, I’d like to know about it 🙂
I expect the 9V battery to last a few months at least.
I have a question though, so does that mean this thing texts you every time you check the mail? I mean, it’s good to see when the mailman delievrs, but that’d be kind of annoying if I get texted whenever I go to retrieve the mail as well… Not sure how to work around that…
Good point. The python script will act every time an OPEN message is received. I keep the script running only when I don’t check the mailbox. That being said, you could program it to only send every other OPEN message or things like that. The provided code was more as a starting point/example rather than a one size-fits all solution.
The problem of notification when I open the mailbox had been a minor annoyance in my design too – I’m thinking about adding a hidden button that I press just before I open the mailbox, that would temporarily disable notifications, and then resume notifications after one minute. Having a *timed* disable as opposed to a disable *switch* ensures that I don’t forget to turn notifications back on.
You could control that with software as well… What I usually end up doing is just watching the message stream when I want to check the mail.
In this case when the magnet is far from the device, the device activates and sends signal. Could it be reversed, so that when the magnet is close to the device it activates.
The point behind this would be that the device could be mounted say close to the door, at the bottom end of the mailbox, while the magnet could be mounted on the outside bottom part of the door. Then when the mailbox is opened, the magnet makes contact with the device and you recieve the notification.
Ofcourse, you would need to weather proof the device. But you avoid placing any parts inside of the mailbox and it would be a little more stealthy.
Just a thought!
Yeah that would work. The sensor produces a 0/1 transition when a magnetic field is applied/removed. The sample program I provide and which I use can be modified to check for the inverse.
Mine is not exactly weather proof – just quick and dirty tape all around. Good enough for now.
I think this is a great little gadget. Now I live in an apartment building and the mail is delivered in a room and place in the mail box form the open back front looks like this http://2.bp.blogspot.com/-GFlroBQw4v4/Tbm4B5ujP6I/AAAAAAAABig/GbafRWQTmfw/s1600/stuttgart_20110501_002.JPG Now would there be a way for this to work on a motion sensor so when the beam is broken or movement is sensed when the letter carrier place a letter in the box it would start a count down of lets say 30 seconds (gives them time to place everything in there) and then send a text message? Lastly I think the real road blockl would be sending the signal from the mail box to your computer or reciver . As for myself I live in a high raise on the 18th floor so 18 stories of concrete above the mail box.
I dont think RFM12B is powerful enough for your scenario, unless you place routers in between to pass messages from one another to the main gateway. Also, RF wireless transmissions don’t like metal enclosures and concrete.
Felix – beautiful job.
1. do you have any plans to mass produce and sell these someday? i’d like to walk into Home Depot and buy one of these puppies turn key off the shelf.
2. did you see this one –
http://blog.makezine.com/2010/12/29/snail-mail-push-alerts/
I have not planned to mass produce these. I started selling in an attempt to fund my side projects and this website, but it’s becoming overwhelming. Either way I think I’m still far away from huge scale production.
Thanks for the MAKE link, it’s interesting, I’ve not seen that before. I am looking to get more projects done around the house, like a garage door status and HVAC control. Still in the alphas on those.
Thanks so much for sharing!
I’d like to build this project and I understand what you have explained here. Could you supply details of what needs to be done on the PC side as far as software installation, connection of the receiver to the PC, etc? Although I’ve dabbled in computers and electronics for many years, I have no experience with Arduino, Moteino, raspberry Pi, etc.
Your video and explanations here are much appreciated and well done!
You will need to connect the receiving unit to a computer (to PC through FTDI cable, to raspberryPI through 4 pins: power,gnd, tx,rx). Then you need to run the python script I have provided – this script listens to the OPEN message and generates an email/sms. Of course you need to load the sender/receiver with the Arduino code I provide, after making settings adjustments to fit your needs. I hope this helps.
OK. Thanks. Just ordered a few parts from your store.
Great, thanks!
Nice! I’m planning on something similar and just ordered two moteinos. A case note: Amazon sells a $10 key tool that comes in a clear plastic weatherproof project case that I’m going to use for the mailbox end. http://www.amazon.com/dp/B007IOHPEU/ref=pe_309540_26725410_item
Uggg … this seems SUPER cool, but beyond my technical skills.
Not trying to squash the DIY nature of this, but are there any enterprising individuals out there who would be willing to make a few “professional” kits with the device already made and an enclosure? In addition to sucking at DIY projects like this, I’m afraid my end product would be believed to be a bomb.
Can you talk a little bit more about how exactly you are sending these messages. I feel like there is a huge gap there.
It seems like this article is like… and then … Raspberry Pi.. blah blah… You get an SMS. It’s like ??????????
I’ve been wanting to build EXACTLY this for my cubby mailbox at my apartment complex, but the box is out of range of my wifi. I don’t know any raspberry pi stuff…
I would like to build this, but can you complete the instructions ALL the way to the point where I will be able to get an SMS message from it?
Quote from the article:
I think that’s pretty clear. The sensor Moteino sends event messages and when the last event occured. The receiver Moteino passes those messages to the host computer, which runs a python script. The python script handles the email/SMS part. Look on github for the source code of that and more details how it actually does it.
Sorry for my befuddlement. Yours will actually be my *first* actual project. I am part of a few people who have started a small club to learn electronics together in Keene, NH… and this is the exact idea I have been talking about wanting to be my first project… You’ve taken a lot of the guesswork out of it for me… I thought I was going to have to tear apart a pay as you go cellphone to get this done. I guess I’ll buy a raspberry pi instead to be dedicated to run the python script at the receiver motino. I think I had better measure the distance to the box though… I’m concerned about that… It’s a pretty good ways distance to the box…. Got any tutorials on relaying that signal…?
Hmm… mine is about 50m away (brain estimate), across the street into my basement through concrete, dirt. I’m using 915Mhz radios for this project, 434Mhz was less performant in this particular one. I mostly find myself turning it on during the hours when I know mail should come (cause I’m there so I can see it anyway), so no real need to actually run the SMS script.
I’m wondering if you could comment on the viability of powering this with a solar cell/battery combo so you never have to change the battery? Maybe a solar cell/super capacitor so you don’t even need a battery!
Thought about it. Even bought the hardware but didn’t have time to play with those yet. That would mean running more wires and making it more obvious, which is not something I want. But I think the solar cell could work in well lit areas if changing a 9V every few months is too expen$ive 🙂
can i have it’s schematic diagram ,
i don’t want any sms alert but just LED and buzz sound to be send into the receiver from the mailbox
The schematic is in the first picture. The receiver is the one that decides what to do. In the receiver, scan for an OPEN message or compute when mail was received using the MLO/MLC messages and trigger an alert (blink LED, or sound alarm etc). The given code was just an example as to how you may use it, but the possibilities are endless.
Might I suggest a reed relay instead of the hall switch ? I know that it’s a rather “old school” low tech solution ,but with a normally closed or change over reed relay your nominal current consumption could be reduced to zero with the MCU just being woken up when the door is opened ! , Battery life = shelf life 🙂
Someone else asked this same question. Bottom line is I didn’t want to run extra wires, second I wanted this as small and compact as possible. I wakeup every 5s to transmit the last open&closed events anyway. A 60uAmp avg consumption on a 9V battery should last a really long time anyway.
Extra wires ?? reed switch = 2 wires , Hall effect =3?
You are right, 2 wires. But isn’t a reed switch almost as big as my whole package? A hall effect sensor is *tiny* and has a schmitt trigger (some intelligence built in), so really unlikely I will get false positives and don’t have to debounce. If you prefer a reed switch go for it. Someone built this with a mercury tilt switch. You can built it with a sonar, with IR LEDs, pretty much with anything you want, provided it fits in your mailbox.
the reed switches I use in my projects are about 10mm long and about 4mm diameter, only downside is that, being glass envelopes, they are not suitable for dropping bare from 4 or 5M onto concrete , though I tend to mount them onto the PCB and then Araldite them into position , then you need to hit them with a hammer to break them 🙂
I’ll definitely look more into using reed switches, provided I ever get some free time for such R&D.
Hello!
Excellent example! I bought some supplies from you and connected it as described above. It didnt work as expected when I didnt got the hall-sensor to trigger with your software example above. I did some tinkering and got the transistor to work, and also the hall sensor. So nothing was broken. I then changed the sketch to read out the analog value of pin14 instead of the digital value (copied your function but changed it so analogRead) and then used this value to make a descision if the magnet is present or not. Value > 100 is (for me) no magnet nearby. Value < 10 is magnet nearby.
Other than this, excellent hardware and delivery! I am going to implement battery voltage control and make the Monteino check the status once a day and send it to the reciever. And also I want to save the result (Mailbox open/close and battery status) to an mySQL DB.
Big thanks for the ideas and the example above!
Nice project 🙂 Wen’t from something simple, and then to something slightly more complicated with the email script 😛
I assume that it’s always dark in the mailbox when closed right? So why not just use an LDR in a resistive divider setup. Just make it high enough of a resistance, and you would be in the µA range for the sensing.
You could also mount the moteino in the back of the box, and just have the LDR in the top towards the front.
I think it’s been mentioned before…mostly because I’d like to know if anyone opens the box at night. Also want it as compact as possible without having to run extra wires. Also … want to be able to remove it anytime with minimum effort.
I love this project but since I have a locking mailbox, this wouldn’t work. Is it possible to substitute an LED and photo receptor (or some optical device) to alert when letters move thru the chute?
Perhaps some mechanical flap switch? The antenna will have to be on the outside though … otherwise the RF signal won’t get propagated too far
Pingback: DIY: Basic Moteino (Arduino Clone) Project - Part 1 - mintrix.net