
 As a break from the pick and place posts, in this article I’d like to aggregate my research about laser cutters and my experience importing a chinese laser cutter. There’s a wealth of knowledge scattered around the web, and this article won’t meet everyone’s search criteria, but hopefully this will be a resourceful stop for those that are in the search for a similar machine on a budget that can achieve the same results as a high end laser cutter/engraver.
I’ve been laser cutting my stuff at Techshop Detroit for a while since as an instructor I had free access to their shop and CO2 Epilog Helix lasers. That was cool but I didn’t have class very often and often when I had an immediate need to cut/engrave on the laser I would have to burn the gas and time to get there, about a 30 mile/35 minute drive (no traffic). Also I had to make sure to schedule well in advance to reserve a spot. And to top it off, they had a major ventilation issue for several months so cutting acrylic was restricted to 1 hour, not nearly enough to do what I needed. A single 24×18″ panel full of SwitchMote covers would take 45 minutes just to cut. Not counting setup, adjusting the machine, making sure it’s clean and ready to go, testing a few cuts on scrap, etc. In short, this was not scaling very well.
So I decided to look for a better alternative, knowing my laser engraving needs would only grow. The common denominator answer was to get my own CO2 laser cutter! Yikes, both exciting and scary thought. Exciting because it would solve all the issues I mentioned and save me tons of time, scary because it’s a big thing to haul around, noisy, hazardous, dangerous if mishandled, requires ventilation, maintenance, liability, etc. Doh…
Anyway, so what were the options?
US made lasers like an Epilog or Universal Laser Systems. Then one day I realized that Trotec Laser‘s USA headquarters and showroom is in my backyard, so I checked them out. Instantly impressed with the build quality and I learned their lasers are made in Austria, as good as German engineered. Both Epilog and Trotec are high end quality professionally engineered. The software is also very easy to use right from CorelDraw or Illustrator, the lasers act as a printer where you can configure the power/speed/cutting/engraving/etc, very straight forward. The only issue with these was the price. The small Epilog laser is around $15K, the smallest Trotec Speedy 100 was close to $20K if I recall and then you’d have to get the air filter, etc, all adding on top. Not really my kind of budget for the tool. I found this interesting discussion about Trotec pricing at trade shows vs. showroom, worth a read if you’re in the look.
Laser cutter kits. Worth mentioning here – there are apparently folks that have built an open source laser cutter which you can buy parts and assemble yourself. This was an interesting read but wasn’t willing to risk doing something wrong, plus the wait for all the parts and then days/weeks to get it right, lots could go wrong. I needed one delivered and ready to work so I skipped this option.
So I started deep dive researching chinese lasers…
Chinese lasers sold by US companies. From what I could tell they are all built very similarly, have similar features, (except size), and have similar controllers. Turns out there are several companies in the USA that import chinese lasers, rebrand them with their name, maybe repaint them, maybe even mod them a little, and resell them at double the price or more. A good example is the Full Spectrum Laser 20×12 which apparently they modify to replace the controller and button/LCD pad with their own, claiming more functionality. The base price for this is about 2.5X more than buying from the chinese vendor, then they resell chinese accessories at ultra inflated prices.
Another company (out of Kentucky?) sells the same thing on ebay.
There’s also Jamieson Laser who sells the same thing at an insulting price of about 3X the real cost.
Rabbit Laser USA also sells a variety of lasers at about the same price range. They do have a good resource page with useful information if you are getting into a chinese laser (remember I said they are all the same?) so bookmark this link, and also they carry a bunch of replacement parts in their store at pretty decent prices, something to keep in mind if your chinese laser “factory warranty” will expire and need a part shipped ASAP from USA.
By the way, on Full Spectrum Laser, from all the forums I’ve spent time on, it sounded like they are a very bad choice. And please don’t spend $2k for an underpowered crap laser like this. Go bigger if space allows because you will hate your days when you have to sit there to insert new material all the time because it will only fit such small loads.
I think you see the obvious that unless you have money to throw away but get the same thing, perhaps shipped faster, you should look look into:
Buying chinese laser factory direct. After much research and debate I decided to take the plunge and get a machine directly from the factory. I’ve read a lot of posts on cnczone.com which is a great website for general CNC type machinery. There is some toxic talk and back stabbing by some of the US vendors and also rivalry between chinese vendors trying to poison each other’s reputation, fun to read chinglish occasionally. I also found a post by this gentleman who actually bought and imported a laser himself and blogged about his experience and shared a wealth of knowledge, a big thanks to him. His article steered me in the direction of G.Weike Laser which seems to be one of the manufacturers and not distributors, which means you will get the best price if you buy direct. They also had good reviews and feedback on cnczone so I decided to contact them. Besides the fact that replies are always 1 day later due to timezone differences, I got pretty quick answers to all my questions and was given a straight to the point quote on all the options for the machine I was interested, which was a 60W LG500 20×12″.
Here are the options I opted for and the quoted prices:
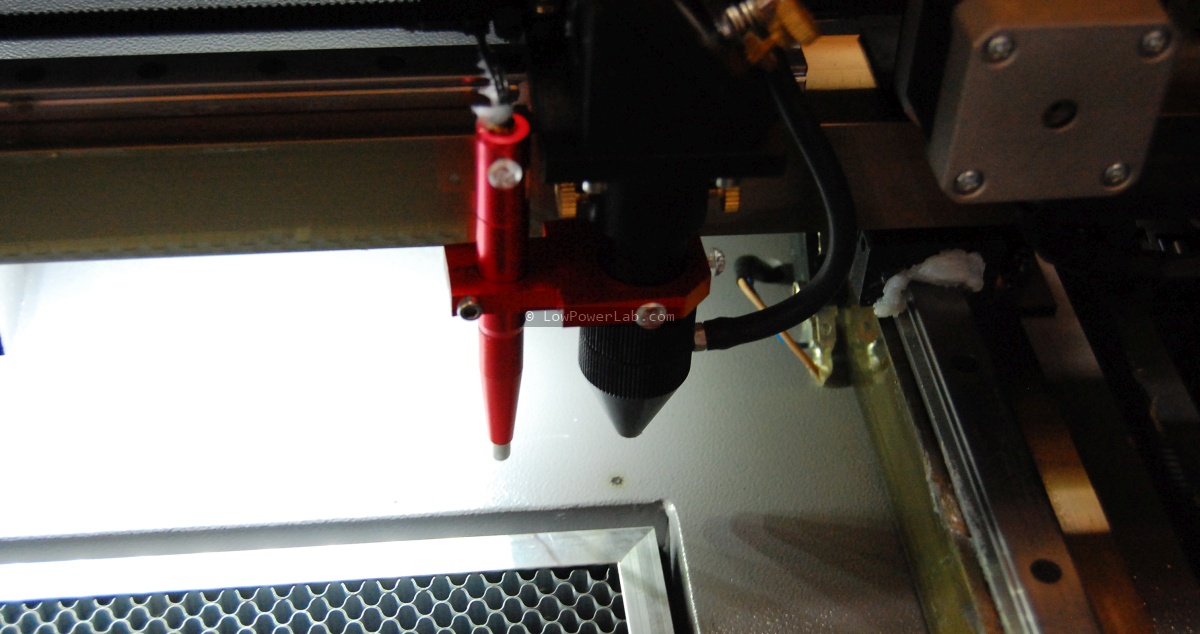
Mostly self explanatory. For the the “red dot” laser pointer – get the option mounted in the laser beam’s path using an extra mirror, and not the one mounted at an agle directly on the cutting head. The reason is that the reflected one will always point where the laser hits, but the angled one will jog sideways as you raise/lower the platform. You can see this annoying effect in this video as he is moving the platform up/down, watch the red dot also jog horizontally, very undesirable.
It took about 10 days of email exchanges to nail down the options, then the payment by wire was sent which took about 5 days of high blood pressure waiting for a confirmation. Then a few weeks for them to get it on a ship (right after their new years holiday so some delays there). The $650 shipping fee means they pay the freight from the port where the box lands, to your door. All you’re left with is paying customs and duties, import fees, port fees, and a bunch of other broker fees. At some point the broker company that gets your box and forwards it should contact you, which in my case didn’t happen so after a few days of confusion and email exchanges with the seller agent I got in contact with the person at the broker company who would handle my case and ship it from the port to my house. Another two weeks of exchanges pass by while they clear the confusion and the crate clears customs. Meanwhile they send me a bunch of paperwork which I had to sign/scan/resend back, that gives them authority to receive the box from the port customs on your behalf and handle it from there. Then I got an invoice for all the duties and their services fees. All these after-the-fact fees added to around $550 for me. One thing that I overlooked was to ask them to not count the $650 freight cost as a dutiable amount. So that increased the cost of the invoiced amount so I paid some extra tax for that $650, something like $30 more than what I should have.
The estimated shipping timeline is quite unrealistic. Count on getting it at least 2-4 weeks later than what you initially were told. I think in total mine took a tense 7 weeks from payment to delivery.
Anyway bottom line was at less than $4K for a 20×12″ 60W CO2 laser cutter, compare that to the lasers resold by the companies above… but I’m not counting all the stress and suspense in waiting all those weeks after wiring the payment, that alone is worth a few bucks. If you don’t want the stress and running around, just go spend $30K on a 60W Epilog Helix, you’ll have it in a few weeks and ready to run with little to no stress, plus the guarantee of a reputable company behind it for at least a little while.
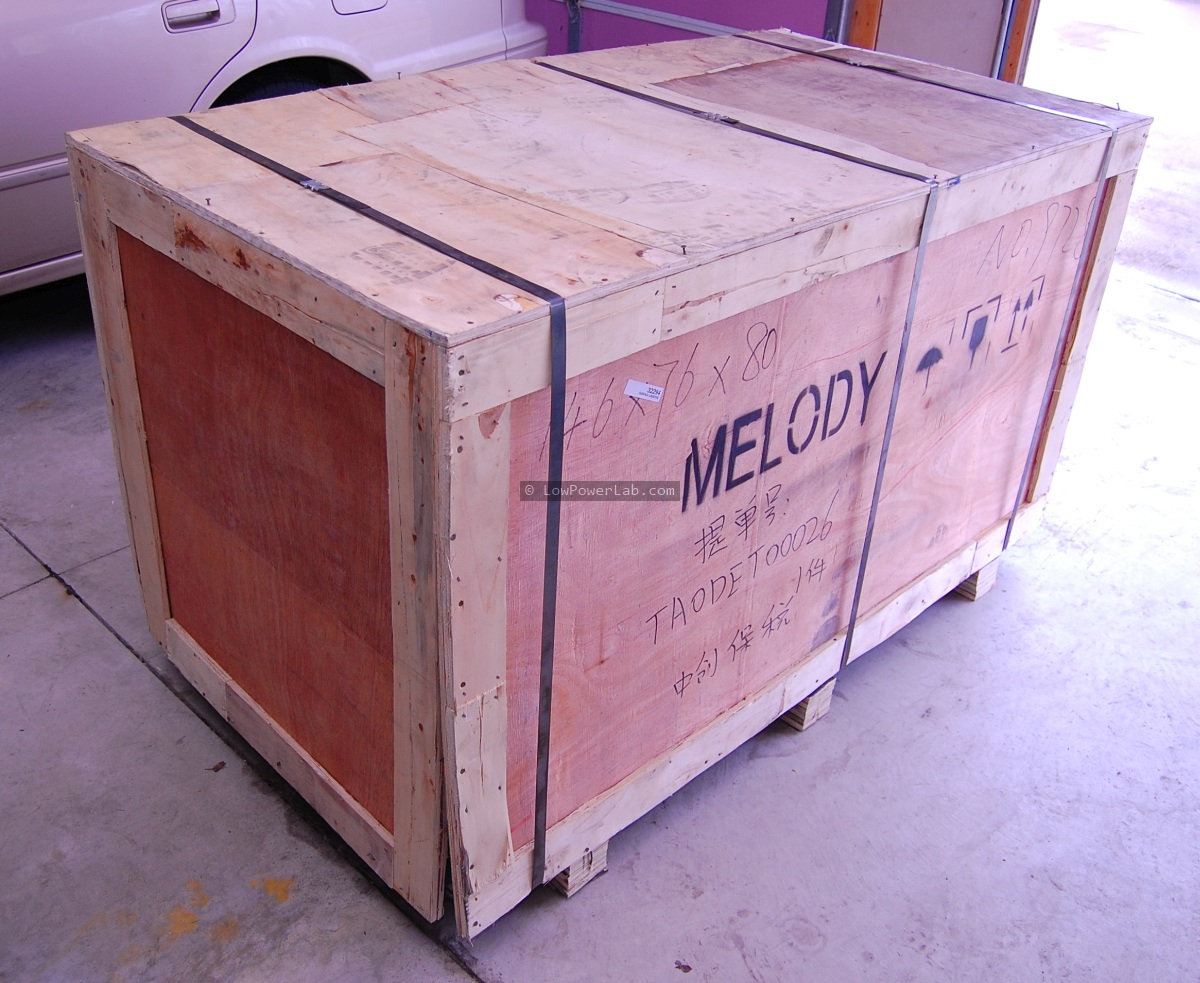
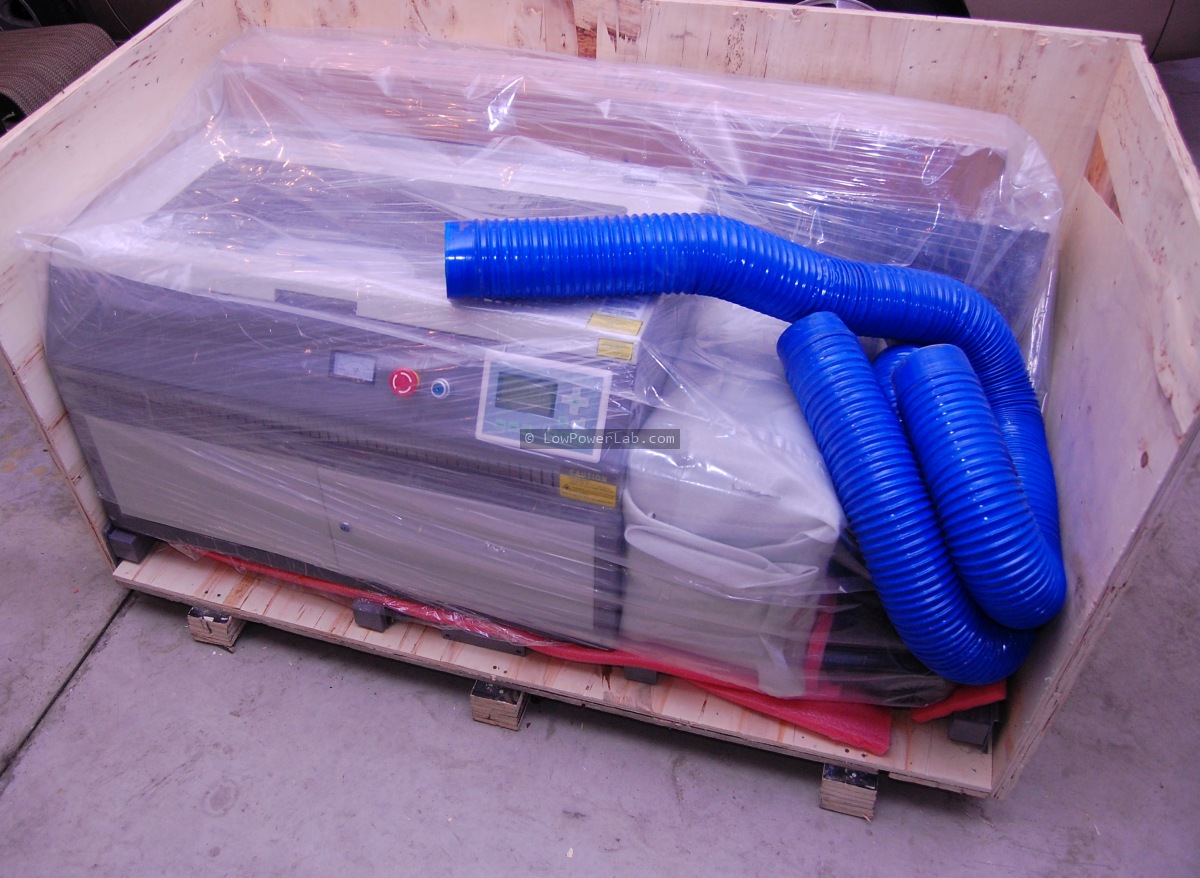
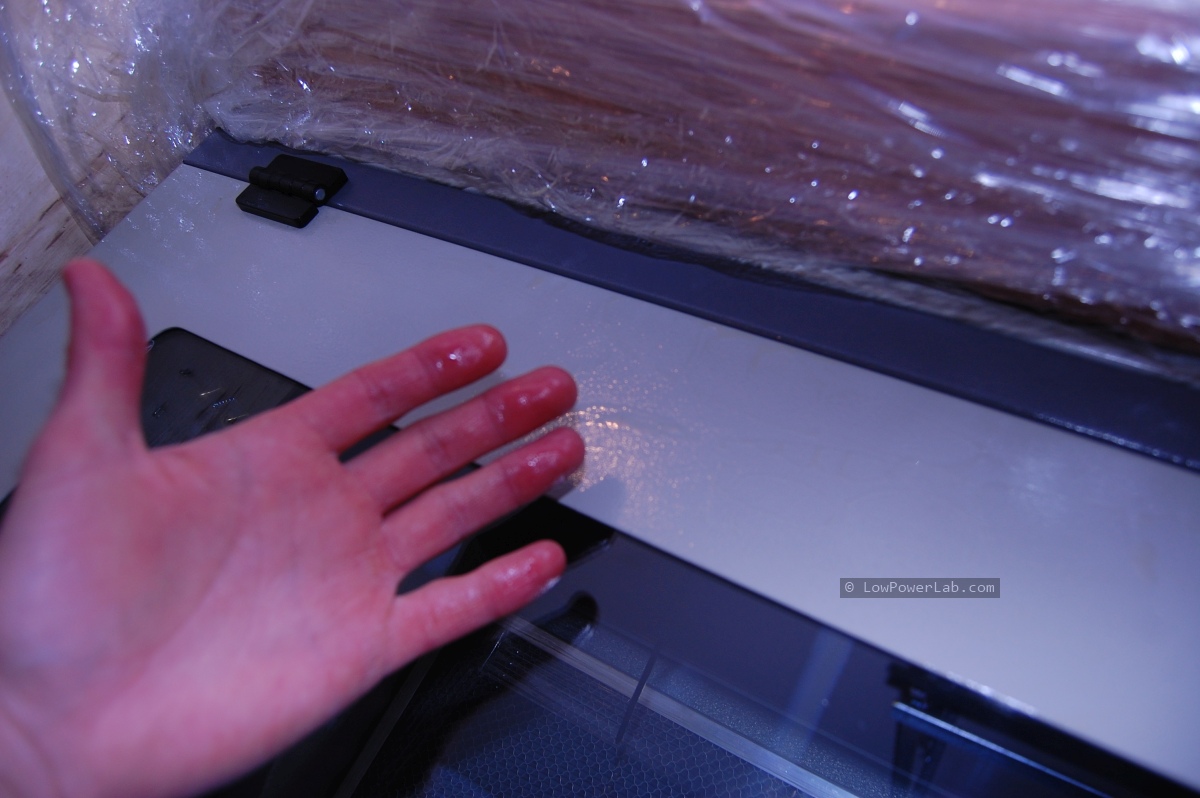
Big crate arrives. Finally it gets here on a rainy day. Pretty well packed. Here are some unboxing pictures. The first thing I notice is the machine exterior is completely covered in a thin grease/oil film, presumably to prevent rust. It has a bunch of doors with key locks, to access the electronics, the belly of the machine, the laser tube etc. Fiddling inside the machine reveals excess grease and metal dust/waste from drilling which is left behind, I’m sure you won’t find that in the US/German machines.
 |  |  |  |
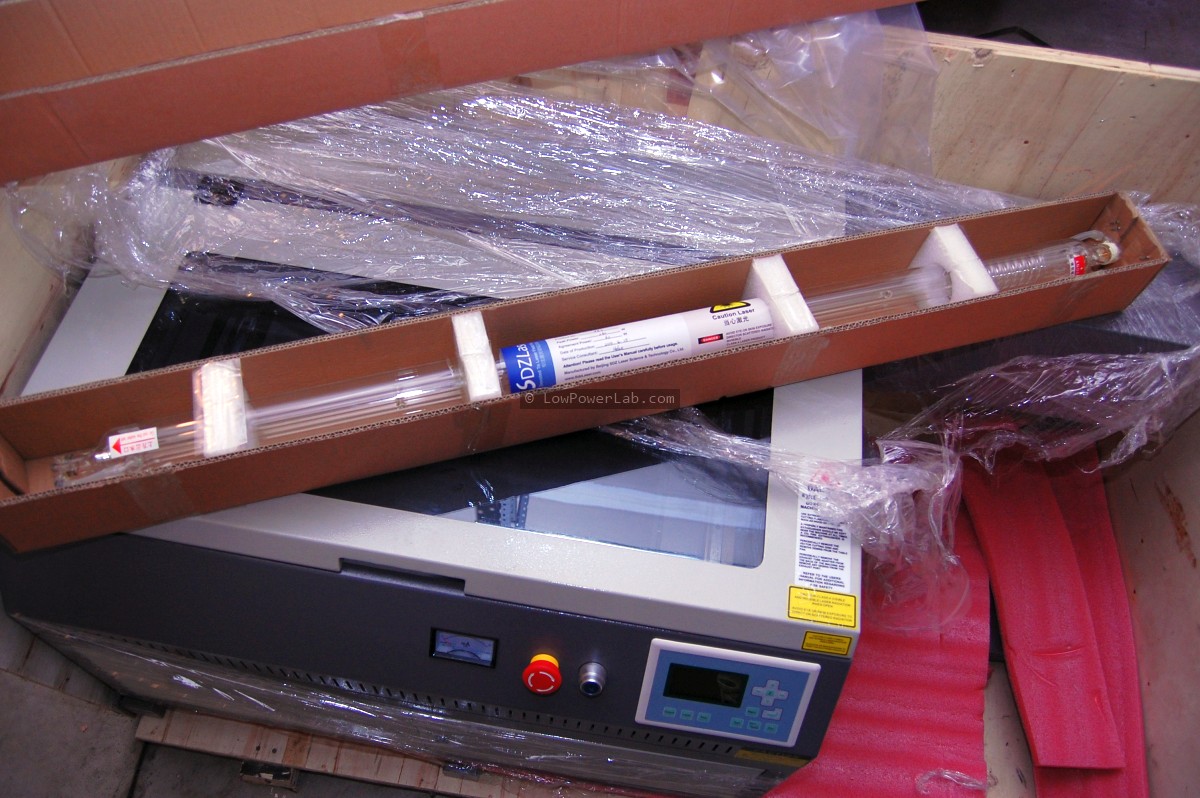 | 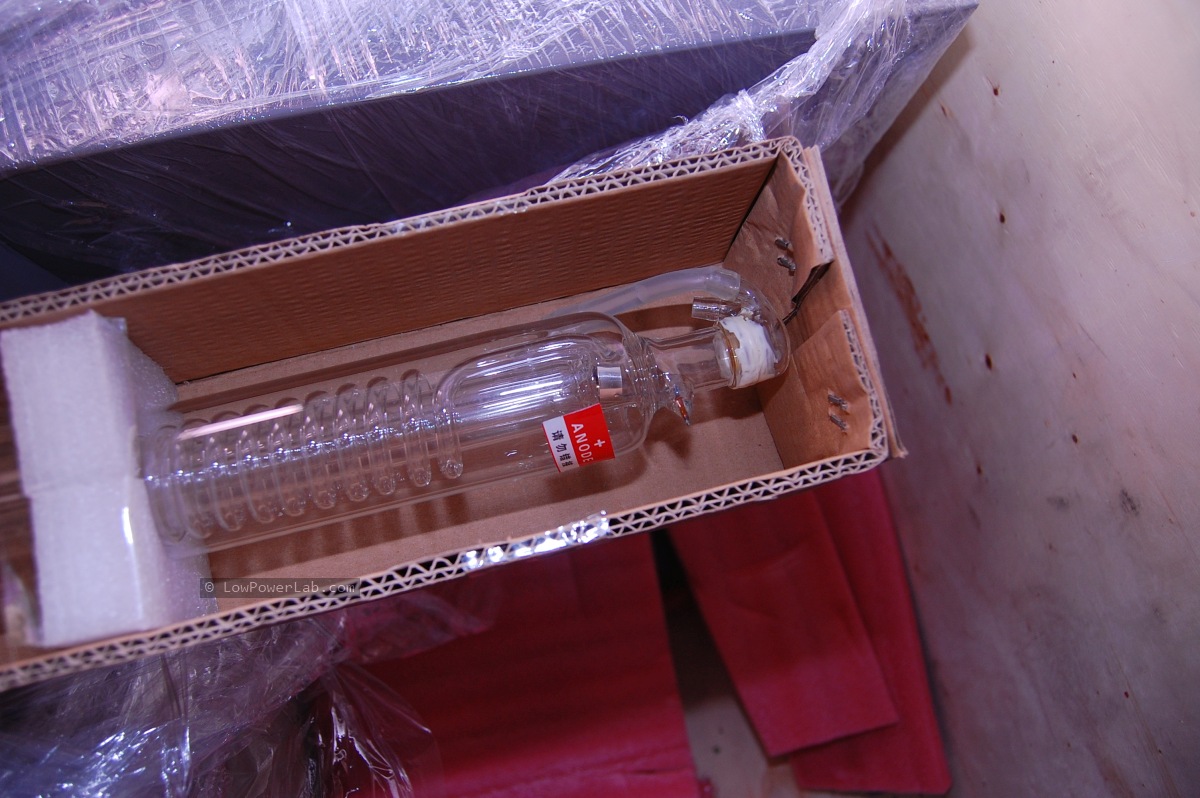 |  |  |
The main ON switch is also key activated, has it’s own different key, overridden by a red emergency stop button with turn reset. All the accessories and extras are packed in their own boxes. There are some “warranty cards”, and CDs which have some user manuals and other chinese/english documentation, not extremely useful. There’s a USB dongle which you want to take good care of, required to start the LaserCut software. Also the extra optics are well packed but very brittle, be very careful when you handle those, I’m reading the ZnSe focus lens can shatter very easily. When you clean the optics use high grade acetone or IPA and be very gentle. See section below for my first cleaning experience.
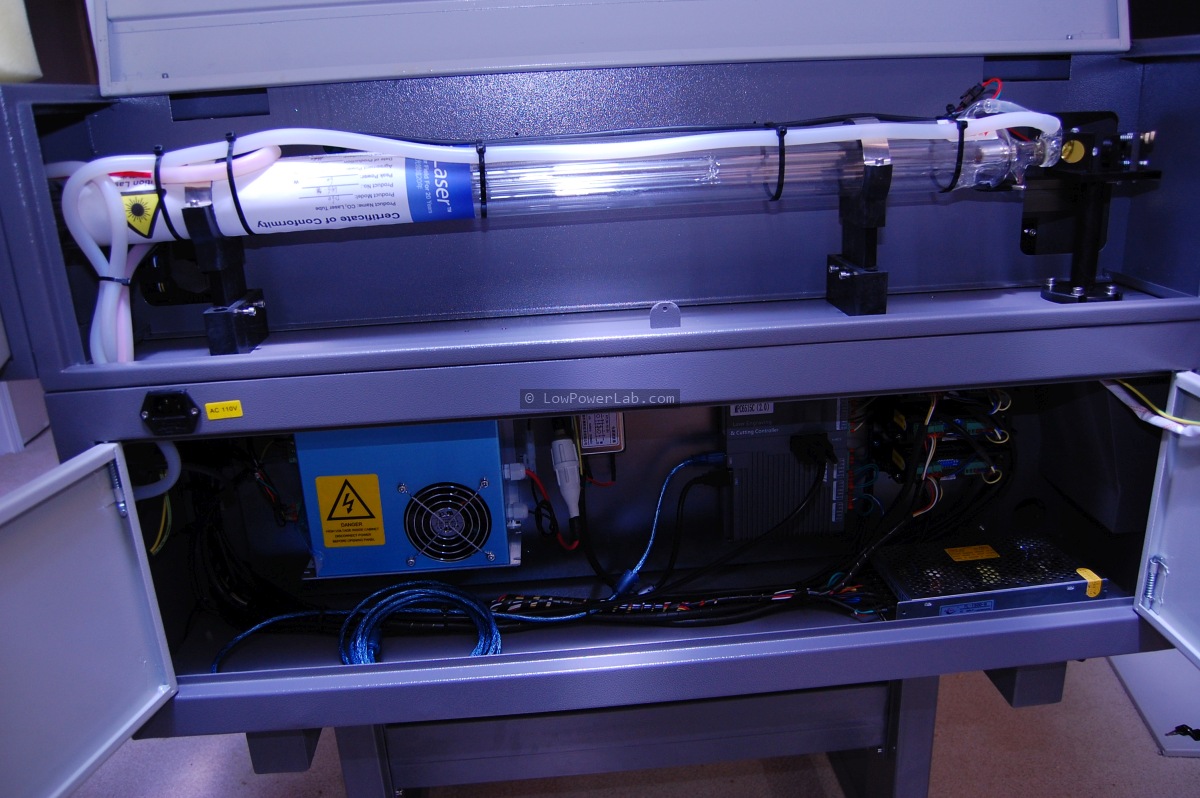
Setting up the machine, first power up and laser test. This machine requires 4 outlets to run: the machine itself, the chiller, the blower and air assist. I wish they could all plug into the side of the machine itself and run on a single outlet, bummer. So I got an individually switched power strip which allows easy switch on for each peripheral. The chiller I got required about 2 gallons of distilled water. Some people use plain water which in time will develop fungus in the laser tube, they report adding some vinegar will clean that up. After connecting the provided hoses into the laser machine (also there’s a wire cable which tells the laser it is being chilled and OK to fire) I turned the chilled on and let it run for a few minutes to make sure there are no bubbles left in the tube. They stress that a lot in the chinglish user manual. Worth to mention that if you squeeze the water hose the chiller will detect it and start beeping, a good thing. Anyway, without the chiller running the laser tube will not fire at all. Initially I tried to test the laser to see if it fires by pressing TEST but didn’t have the chiller on and was quite frustrated/worried that it won’t do anything, unlike the manual said. Obviously they missed mentioning that without the chiller the laser will not fire. So after I turned ON the chiller, pressing TEST will fire a short pulse. I failed to move the head from the homing position, which is not over the honeycomb area, but on the far upper right, over the painted metal frame, so that burned a spot in the paint. No biggie, I was just desperately trying to see if the thing would fire at last, I knew the laser power supply wasn’t DOA. Also the cables to the chiller and the blower were very poorly/loosely connected so I reinforced them to avoid easy failure from long term use and vibration. And here’s the laser installed and ready to work:
 |  |
Fixing the red dot pointer. Another thing I was trying to figure out was the red dot guide laser pointer. It was installed and all, but I thought it had to be turned ON from the interface like on the Epilog laser. Turns out I was wrong, it should be ON as long as the machine is ON. After some more emailing to the seller agent, I was able to rule out backwards wiring (the red laser is a diode so hooking up backwards will disable it). Also it tested 5V on the two wires. Somehow as I was fiddling with it while the machine was ON, I realized it was a loose connection somewhere in the assembly that held it in place. I’m pretty sure that didn’t come loose during shipping, wondering if they at least did a turn ON test at the fab to make sure the pointer works after installing it, after all it was an extra $100. Anyway, pretty easy fix, and things were starting to look better. Except…
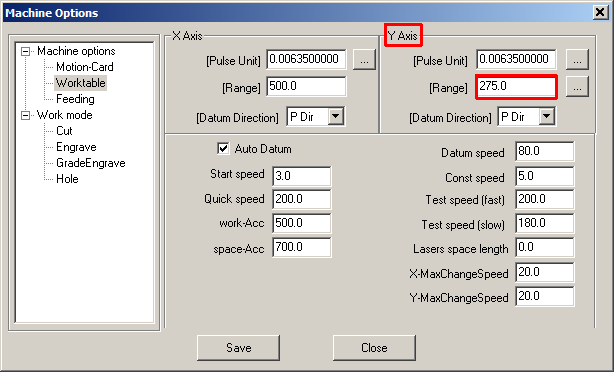
The head won’t move all the way towards the front. As I was figuring out how to operate the controls and move the head around, I noticed the head would only move around 70% of it’s total width (Y axis) from the controls. Intriguing, looking inside the machine I thought maybe the Y axis limit sensor was mounted too far back. Here’s what I mean.

So after more emailing back and forth, I was able to figure out that the “virtual” work table is being loaded into the machine from the LaserCut software. So the machine has to be told what the size of the work area is. In my case I think the work area was loaded incorrectly (too short on the Y axis) from the fab. Perhaps this explains the generic nature of these controllers, they are universal for any size work area, you just tell it how big the work area is. Here’s where that setting is in LaserCut 5.3, I had to play around with mine to make it fit the honeycomb space – making it too large of a number causes the head to hit the outer limit and make an angry crashing noise, not good, so the good number for me was something like 350, save it here and click Download Config in the main window, which saves it to the machine with a beep:
Missing USB host outlet. The machine has a USB memory stick outlet if you want to run it standalone without a computer. There was however no USB main connection (like a USB on a printer). Looking in the electronics compartment revealed a USB cable that connected from the MCP6515 controller but was left hanging in the compartment. I could only guess that’s the cable that should lead to another USB connector they didn’t add on the casing where you could connect to the outside world, to the computer. Not the case, so at the moment I’m just using that cable (long enough) to connect my computer directly in the back of the machine, to the controller. Maybe I will make a cut and add a female USB connector myself later on.
Ok so finally the blood pressure was going towards normal, it looked like I had a fully functional machine that I was able to configure to move over the full work area.
LaserCut 5.3 won’t work in CorelDraw X5. I specifically asked this during the initial conversations. I was told that YES, the LaserCut will work from Corel. Well that’s not the case, and asking the seller agent about this didn’t yield any answers. Supposedly when LaserCut installs on the computer, it will add this printer driver so you can print from Corel, similar to the Epilog Helix. That part doesn’t work however, not on Windows7 64bit, it crashed and hangs CorelDraw and any other program where you attempt to print to the laser printer driver, and looking around on the web it sounds like it will only work up to CorelDraw X4, not above. So bummer there. I am stuck to the clumsy LaserCut 5.3 interface. It sucks at first because you have to learn yet another program which stands in the way of you being productive on the laser. But it gets better. I learned that I can export my designs from Corel to DXF, then import those into LaserCut. The scaling is preserved and it’s basically just an extra step. LaserCut allows you to delete objects, lines, etc so it’s not too bad after all. But steep learning curve overall…
Getting the laser tested and using the controls. After I figured out how to make the laser actually fire, and how to load the LaserCut 5.3 software and import my stuff from CorelDraw, I started doing a bunch of small scale testing, figuring the controls, homing/focusing the Z axis, navigating the menus, and making small cuts. I kept the blower and assist off thinking it won’t make enough smoke. I should have turned them on at all times when the laser is firing though. I think those initial tests produced enough fumes and smoke that got stuck on the head focus lens. So the cuts were becoming inferior and I had to keep slowing down the machine to make the same cuts go through the material. That was because before using it, I should have cleaned the lens.
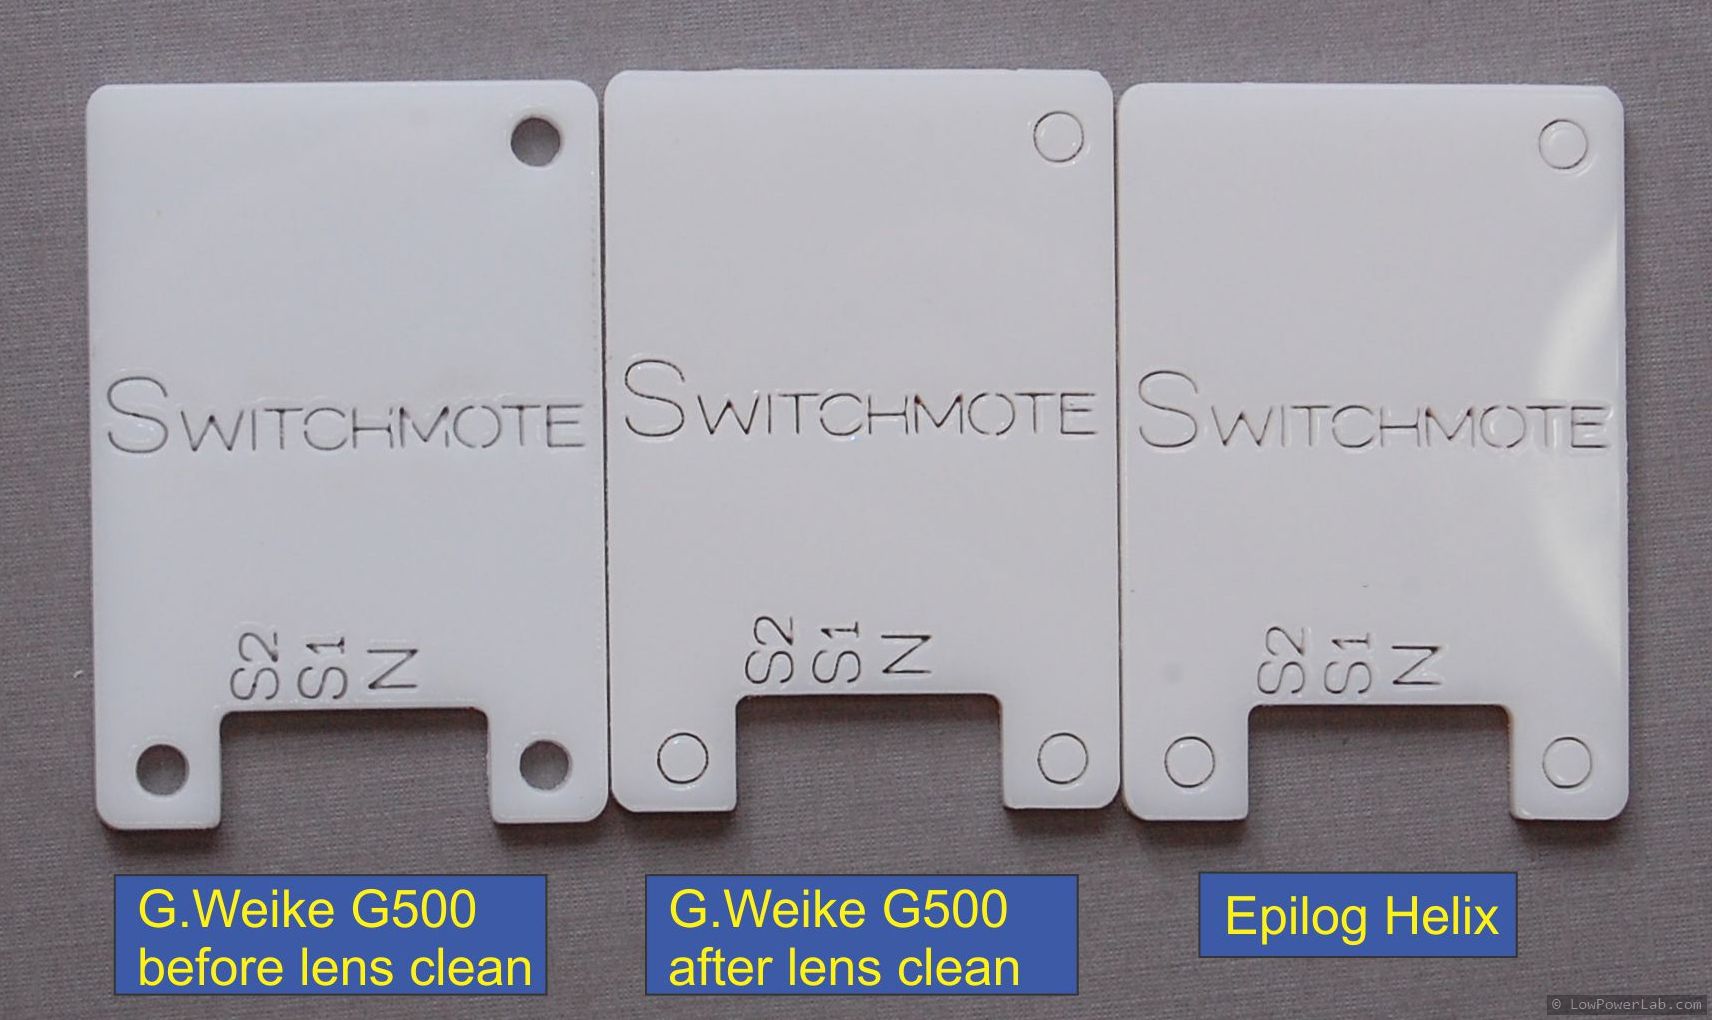
Cleaning the lens. So me not using the air assist and vacuum blower put some smoke on the lens during my initial tests. So I looked at the focusing lens and the last mirror (the one on the moving head). They were quite dirty, especially the focus lens. Obviously there was some debris on top and under it from before me using it also. I was able to clean them carefully with some Qtips soaked in IPA, after dismounting the head assembly by un-tightening a few screws. The quality of the cuts was immediately noticeably improved, and I could speed up the laser to at least double to achieve the same cuts as before. Also at this point I could tell the laser beam kerf and cut cleanness was about the same as the Epilog laser, I could tell from the SwitchMote text that I cut into the covers for my SwitchMote PSUs, the photo doesn’t do it justice. Also speed could be tweaked to be about as fast as the Epilog:
 |  |
For what it’s worth – when I took apart the focus lens from the head, I made sure to mark the height position of the focus lens assembly, so I could align it back with the Z axis focus sensor.
Mirrors/lens align & calibration. Finally, worth to mention that the laser tube was installed in the machine, and the mirrors and focus lens were already calibrated to the laser beam so I didn’t have to do that myself. It was ready to cut/engrave out of the box without any adjustments. Same goes for the red laser pointer, it was aligned to the main laser beam. If I need to do this I may blog about it when the time comes.
Power consumption. I used a Kill-A-Watt to figure out how much power is drawn by each module. The conclusion was that I can keep this on a single 15A circuit. Here’s a breakdown, all numbers approximate:
- 900W – everything ON, laser firing
- 60W – chiller only
- 100W – assist pump
- 160W – blower
- 470W – everything except laser firing
- 400W – {chiller, assist, blower} ON, laser machine OFF
Conclusion. I think it was worth it. Definitely a learning experience, my first time importing such a big machine that went through US border customs. It was a lot of stress, crossed fingers and lost neurons. A bunch of small bumps to getting the machine in fully functional order, and a big relief seeing the machine perform as well as the Epilog Helix at Techshop. The only downside for now is that at 20×12″ it’s still smaller work area than the hefty 24×18″ I was spoiled with on the Epilog. How long before something fails? I don’t know, hopefully long. They say they have 1 year warranty for anything that breaks, they will replace it free of charge and ship it by DHL. That’s good but I hope I don’t have to make use of that warranty.
Well this got very long, but I hope worth the read. Enjoy and let us know if you imported your own chinese laser after reading this article.
Cheers,
-Felix
Low Power Lab LLC
Fantastic read Felix, not too long at all. This was invaluable for anyone thinking, “there is that corner in the shop…” and how well a laser cutter would fit there. I know I am. I am also vicariously following along on the pick and pack journey. Keep up the great work and great learning materials!
I enjoyed this article very much and commend you for not only taking the time to document your experience, but also for having the perseverance to do it in the first place!
I’ve built my own DIY CNC Router (25×25) and have been looking into some way to develop laser cutting capability. This article is excellent in that it covers the TOTAL cost of a ‘low cost’ cutter and has convinced me that it is still out of reach for me. Maybe DIY is still an option, but I doubt it 😉
I have begun this process and at present my shipment is stuck in customs in LA. I was extremely worried about the outcome but, after reading this post, my blood pressure is slowly falling to more normal levels. Apparently it is being x-rayed so that nothing extra hitches a ride with it. My shipment was valued at $4480 so it appears that I will pay more fees than you did. I am puzzled that it is not possible to get a ballpark estimate on these fees. I have opted to pick mine up at the port of destination so I must deal with the (US) customary rudeness when I receive the shipment. I travel quite a bit between Michigan and Canada so I have dozens of stories to tell about how law-abiding Americans are treated by our border’s official welcoming committee.
Great write up Felix! You lucky to get one, I’ve been drooling about them for some time now 🙂
How do you manage fumes? Did you get a charcoal filter or just vent them outside? I’ve read those filters are pretty expensive… Also curious if you tried cutting 1/4″ acrylic, does it do a clean cut? I’m little worried about 300mm limit, as it’s just a little under 12″ which is common size for acrylic sheets. Is it possible to fit full 12″ sheet in the machine?
I vent everything outside. I have not really tried 1/4 acrylic but the thicker the material the more visible the effect of the moving laser head is on the cut (less than perpendicular cut). The cutting areais about 19×11″ but there is more room around it so I can fit larger sheets – then cut along to split them and then work it from there. Imagination helps a lot 🙂
Great Felix, I’m looking for cheap engraving machine and think the one you got it very good comparing the price. i have question.
Did you try it to use it in coated metals as photo marking or logo? If so, how resolution quality in photo marking comparing with Epilog laser machine.
I’m looking for one engraving laser machine that capable to do photo marking in coated metal such as ipad or iphone.
I did not do any coating engraving, should work about the same I think.
I have recently purchased a laser cutter from g weike as well. The experience has been positive so far and G Weike has been very responsive. The broker has also been very patient and helpful. However I am now having some difficulty with the FDA clearance. Do you have any details you can share on the FDA aspect of the import?
My crate arrived today and is waiting to clear customs and FDA. My broker has asked for the manufacturer’s FDA registration. I passed the request to G Weike and they provided a document. The broker told me it was not the right information. I went back to G Weike and they sent another document but it doesn’t look like it contains what the broker is asking for either. I think there is a misunderstanding about what is actually required. I have asked for an FDA contact to call to try to get a better understanding. Any other suggestions?
I recall similar issues with the clearance. I don’t remember the details, there was a bunch of paperwork. Basically the broker should be able to help answer the questions, but as I recall they were also not very knowledgeable although pretty patient and responsive. Sorry I don’t have more details at this point. It was a hassle and it took about 2 weeks or more to get it out of customs and on the road again.
hi Felix
Great info..
I agree with Ali..it would be great to know of its capability’s
i.e.. photo marking in coated metal such as ipad or iphone.