
In the previous part of this post I described the conceptual high altitude picture of a secured, realtime home automation gateway. In this part I will go into more detail and show some of the issues I’ve faced and and solutions to address them.
First, the webserver had to be put behind a mandatory SSL connection. All incoming HTTP port 80 traffic would be permanently redirected to secure sockets layer port 443. That was pretty easy with a self signed SSL certificate and some webserver configuration. Then HTTP basic authentication was put in place so that users would first need to be authenticated before web access would be granted. Again, not too complicated, using a .htaccess file and some changes in the webserver config file. Custom authentication can also be implemented, but for the purpose of this tutorial basic auth is good enough.
Now to the harder part. I wanted the websocket server as a separate entity from the main webserver. Several reasons for that, but mainly because of scaling and I like to keep separation of concerns and have a modular design. That exposes several issues.
- Websocket server will listen/serve at a different port than the regular web traffic port. It can be anything really, but would keep it above the first 1024 special ports (most examples use 8080). Whatever it is, in order to talk to your websocket you need to hit your IP at this port. Which means you have 2 separate “pipes” going between your browser and your Pi. Not ideal. Here’s what that would look like for those that like visuals:
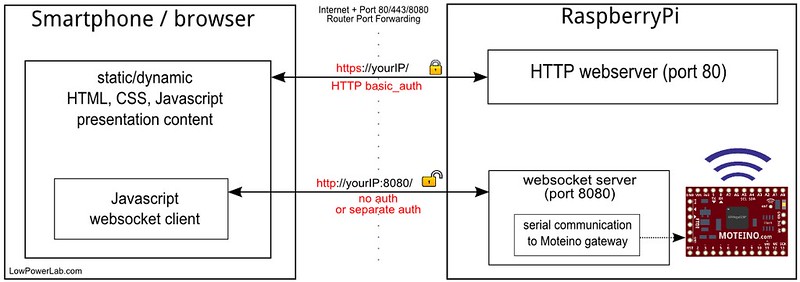
- Since the websocket communication is separate, it is exposed. Some people would tend to say that it’s still a fair solution because it’s technically secured by obscurity. If the web content is secured, then your websocket is obscured because you’d first have to know the IP address and get the web content to know the port number of the websocket. Agree, but still not really secured since obscurity will fail to a port scanner and the websocket pipe is still not encrypted. That’s crucial because the websocket will likely delegate your commands that will interact with your automated home or target. You want peace of mind right?
To solve this problem, here are 2 potential approaches:
- Secure and implement authentication on the websocket separately. This could work but now you’re keeping track of 2 things and you’d still hit that IP at the separate 8080 port. Again, not ideal.
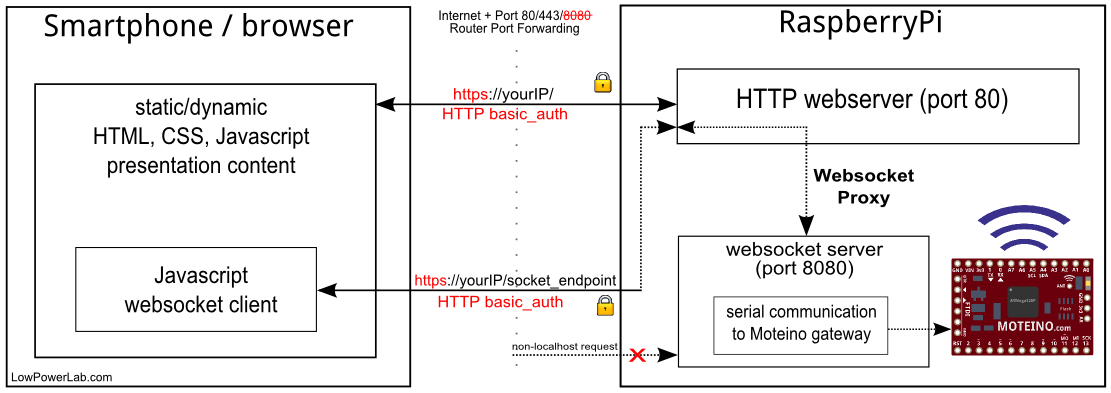
- Proxy the websocket through the webserver. This would solve all our problems. First the websocket would act like it’s behind the same port as the web traffic, no more port monkeying at the client side. Second, the web pipe is already encrypted with SSL and authorized with basic_auth or your choice of auth. So it’s a win win, I like this much better.
The remaining fine details are things like:
- Router port 80/443/8080 forwarding. I won’t go into details how I did this since every router is different, but conceptually it’s the same thing. The web talks on ports 80 and 443. Your Pi sits behind your router at some LAN address that looks something like 192.168.X.X. The internet doesn’t know that, it only knows your external IP (check it at http://whatismyip.com). So your router has to route incoming web requests internally to your Pi which handles the rest. Since you’re encrypting the web content you have to forward both port 80 (so initial HTTP requests would make it) and port 443 (so the rest of the HTTPs traffic would work), to your internal LAN IP address of your Pi. Also for the websocket you’d have to forward the websocket port but we’re trying to make the socket exposed on the same port as the web requests so hold your horses on this one.
- The websocket server can still listen on that port 8080 over an unsecured HTTP connection, even though we are proxying it through the webserver, since natively it does run at that custom port on the Pi. So to solve this issue we need to reject any requests that are not coming from the Pi’s webserver (only allow proxied localhost traffic, local from/to the Pi). I will show how that is achieved when explain the websocket implementation. So now that we’re rejecting external websocket traffic we can also exclude port 8080 (or whatever the websocket port) from the router’s forwarding table.
Here’s the final diagram of what we’re shooting for, the websocket is tucked away and only listens to the webserver, and everything works on a single encrypted and authenticated endpoint, no messing around with websocket ports:
In the following part I will go into the next level of detail and its challenges, what technologies were chosen and why, and how to install and configure everything on the Pi to make this setup possible.
Hello, have you considered autobahn (http://autobahn.ws) for websockets and twisted (https://twistedmatrix.com) as the web server? Keeps all the code in python and very rpi friendly. Supports encryption, authentication and authorization, so does a lot of the heavy lifting for you.
Never heard of them. There’s others like that, like express.js (node.js based), I’d probably go with that over python. Anyway, I already explained why I wanted a real webserver.
FWIW, Autobahn/Twisted allows you to run a Web server + WebSocket server within the same process, either on different ports, or on the same port, like e.g. 443/TLS, which is good, since running WebSocket over non-standard, non-TLS will limit compatibility within locked-down networks.
Here are 2 examples:
https://github.com/tavendo/AutobahnPython/tree/master/examples/websocket/echo_site_tls
https://github.com/tavendo/AutobahnPython/tree/master/examples/websocket/echo_wsgi
Thanks for the suggestions. There are other alternatives similar to autobahn, some in node.js some in python. However I have much more confidence in a standalone webserver that I actually saw benchmarks and tests run against mainstream webservers like Apache, and a standalone websocket for the home automation, plus I have to run PHP, perhaps a full blown website like EmonCMS which needs to be fast, I just don’t feel like putting all that in a python script makes sense… at least not in my case. Also remember python is interpreted.
I like your approach. My conceptual design is similar but using the new Udoo Quad instead of the RPi as the gateway. You are much further ahead in your gateway design that me – still waiting to get my hand on the Udoo to know its limitation.
For $129, you could just buy a mini-itx with an Atom processor or even a full dual/quad core and run windows/linux on it. I think that would make more economic sense at that price range.
I already have a atom mini-itx board running as my media center but the power consumption is still higher than I would like. The Udoo is really trying to lower the power consumption further and see how far I can push it – environment monitoring, security sensor, media center, home automation…. before it break.
I’ve been down this road a few times before, on the raspberry pi, and the beaglebone black, both. If you want some help/insight, I am happy to help. just ping me over email.
I think nodejs is a very suitable platform, works very well for me. Here are a couple projects I’ve been helping with, you should take a look at:
https://github.com/chrismatthieu/skynet
http://www.youtube.com/watch?v=cPs1JNFyXjk
My websocket enabled frontend to the pi:
http://www.youtube.com/watch?v=EZtUmJyRNxo
Talking over serial on the BBB to the module originally designed for the raspberry pi: https://plus.google.com/u/0/112693340411141805940/posts/BPVmjEyvfSy
That’s a cool demo, thanks for sharing, so what hardware do you use to control all those things in your home?
Thanks. Most of the hardware is Clipsal stuff. I had the luxury of hard wiring everything during the building process. On the wireless side I have some ZWave sensors, and also am using RF12B stuff I inherited from a failed openenergymonitor.org experiment.
All tied together with nodejs.
I’m actually pretty optomistic that I can use some moteinos. What is the best way to talke from a BBB or Pi to the moteinos? I assume there is some sort of a serial interface? Or is there a better way?
You can talk to them directly through the serial/uart interface. I just power my gateway Moteino from the Pi, and connect the GPIO uart to TX/RX. Then node.js and node-serialport can take it from there.