Importing a laser cutter from China

As a break from the pick and place posts, in this article I’d like to aggregate my research about laser cutters and my experience importing a chinese laser cutter. There’s a wealth of knowledge scattered around the web, and this article won’t meet everyone’s search criteria, but hopefully this will be a resourceful stop for those that are in the search for a similar machine on a budget that can achieve the same results as a high end laser cutter/engraver.

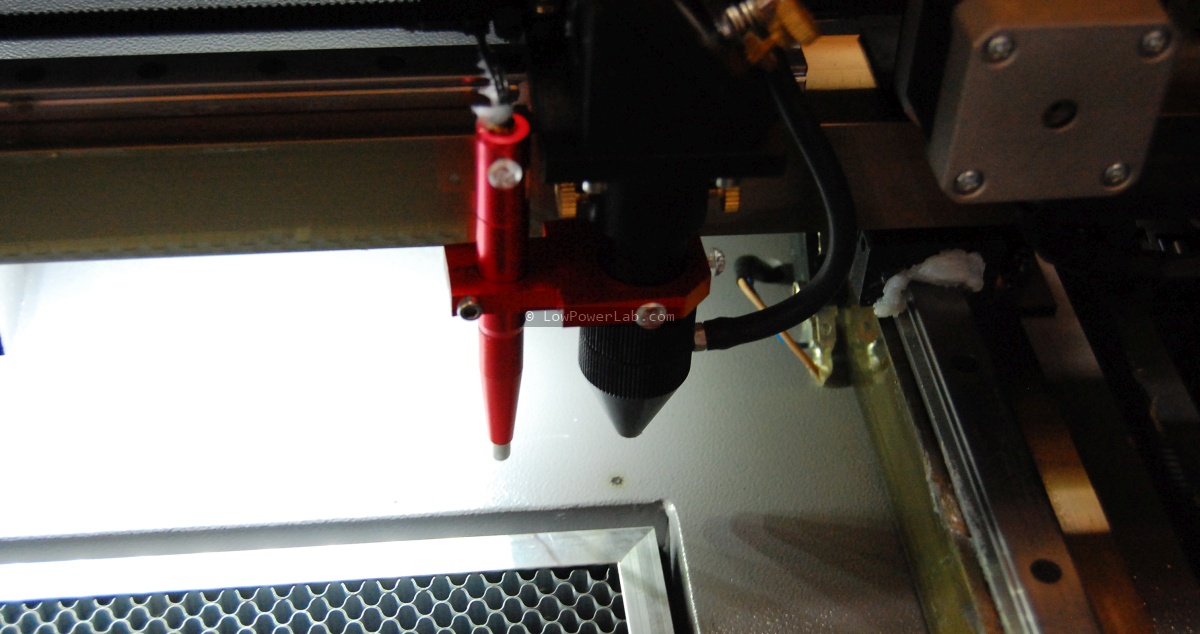
I’ve been laser cutting my stuff at Techshop Detroit for a while since as an instructor I had free access to their shop and CO2 Epilog Helix lasers. That was cool but I didn’t have class very often and often when I had an immediate need to cut/engrave on the laser I would have to burn the gas and time to get there, about a 30 mile/35 minute drive (no traffic). Also I had to make sure to schedule well in advance to reserve a spot. And to top it off, they had a major ventilation issue for several months so cutting acrylic was restricted to 1 hour, not nearly enough to do what I needed. A single 24×18″ panel full of SwitchMote covers would take 45 minutes just to cut. Not counting setup, adjusting the machine, making sure it’s clean and ready to go, testing a few cuts on scrap, etc. In short, this was not scaling very well.

So I decided to look for a  better alternative, knowing my laser engraving needs would only grow. The common denominator answer was to get my own CO2 laser cutter! Yikes, both exciting and scary thought. Exciting because it would solve all the issues I mentioned and save me tons of time, scary because it’s a big thing to haul around, noisy, hazardous, dangerous if mishandled, requires ventilation, maintenance, liability, etc. Doh…

Anyway, so what were the options? Continue reading

Laminator dimmer hack for PCB or stencil toner transfer

This post will walk you through a dimmer enhanced laminator mod that allows an alternative method to transfer toner to PCBs or metal stencils.

The clothing iron transfer method works pretty well to make metal stencils. But for larger stencils it might not be so feasible, and a lot of people reported that they could not get a consistent transfer with their irons, maybe because not all behave the same. I have to say there can be lots of potential points of failure in this process. It’s a lot of trial and error, and my stencil tutorial was meant to help with eliminating some of those failures that I’ve gone through. I decided to try the laminator mod to see how that works compared to the iron. Continue reading

DIY SMD metal stencils – the definitive tutorial

In previous posts (here and here) I described my efforts and research to develop a DIY method to make good quality SMD metal stencils at home. I have since experimented some more and I believe I found the best method (so far) to do this with very cheap materials, yielding very good results.

Since transferring the toner to the soda can aluminum alloy was the most challenging part, I kept experimenting with different transfer mediums and other ways of possibly facilitating and perfecting the transfer.

Finally the solution is here: consistent, repeatable, “perfect” toner transfer, every time.

Continue reading

DIY metal stencils – video update

UPDATE: See the “definitive tutorial” post on how to make these.

I posted this video of the latest SMD stencil I made for my Moteino project. I ended up shrinking the pads by 8mil on this one, the reason being that the previous stencils I made I shrunk by 5mil and the stencil would dump too much solder paste, causing some solder bridging. See the stencil step through post for details how to make this.

I also discovered another very good method to transfer toner: silicone coated paper. I wiped a very thin layer of clear silicone on a blank sheet of paper (on half of it). After it dried I printed the mask directly to it. The iron method will give very good results, the toner will either transfer 100% or not at all. The spots where it doesn’t transfer are fixable with a thin Sharpie pen. The tool you use to spread the silicone has to be very flat and even, any unevenness will result in less perfect toner transfer.

DIY metal stencils – a step-by-step guide

smd_stencil_done_wThis is a step through to make your own metal stencils for PCB solder paste application. In the last post I described my trial and error details of picking the materials. I am using beverage can aluminum for the stencil material and transparency film for toner transfer. In the meantime I discovered that many other materials can be used, especially for the toner transfer medium, with various degrees of success. Read the notes at the end for details. This etching method will not produce the highest quality you can get. Laser cut stencils are higher quality but a lot more $$$. For my purposes such a home-made stencil serves me very well, and saves me a TON of time (I can now apply all the solder paste in one wipe instead of using a syringe to hand apply it on all the pads). Solder paste is very forgiving and even the most imperfect stencils I produced this way give good results after reflow. The whole point is to try to apply an approximately even amount of solder paste to the pads, such that during reflow, all your pins will look the same and won’t form bridges. Overall I think the cost vs outcome/quality ratio is very good. Once you get the hang of this and develop your own routine and choice of materials, in less than 30 minutes, you can produce a high quality home-made metal stencil (almost comparable to a stainless steel laser cut). Continue reading

DIY metal stencils – research & materials

MOTEINO_TOP_CREAM
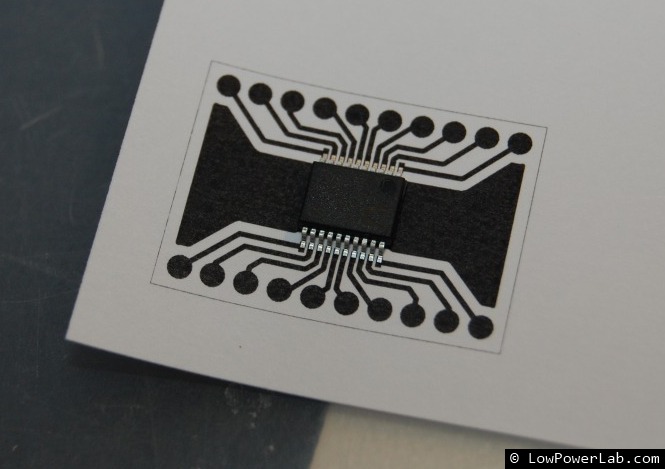
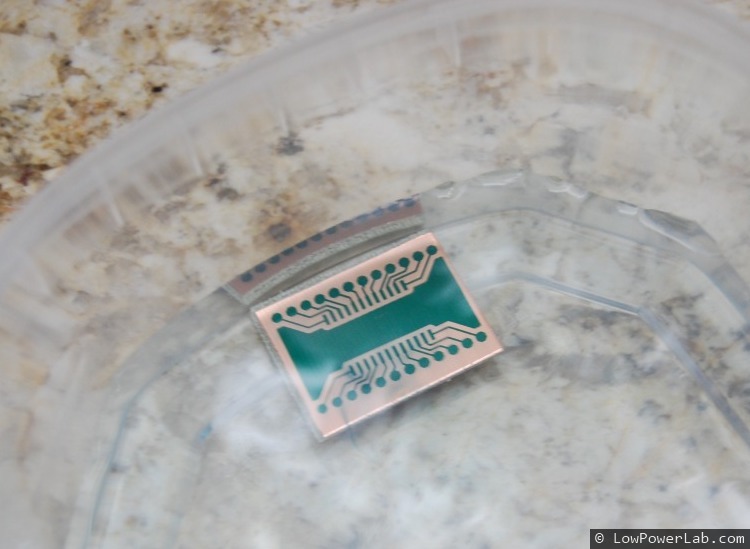
Stencils for SMD solder pasting are becoming less expensive. Companies like ohararp.com makes your custom Kapton-polymide film stencils for $25 per 8×11″ sheet. Not bad, but I’m not sure if they allow you to fill that sheet with more than one design. It’s plastic and it will wear out fast, fold easily, etc. My DIY adventures involve mistakes sometimes and I appreciate mistakes because they teach me a lot, but not at a rate of $25+shipping and a week of waiting per mistake. I want better. Continue reading

Cheap home PCB etching with vinegar!

In my first post I’ll describe how I etch PCBs at home with a less conventional but cleaner method, using vinegar as etchant. Yes, vinegar! Vinegar is somewhat slow compared to strong acids like ferric chloride or muriatic (hydrochloric) acid, but its much safer and less hazardous, and there’s an easy way to speed it up. When I first tried it I instantly liked it and never looked back.

Continue reading