MoteinoMEGA based Data Logger

Ed Mallon runs the Cave Pearl Project which is all about “developing a data logging platform from inexpensive pre-made breakout boards, and are using this at the heart of new environmental sensors that anyone can build.” Ed is also a contributor in the forum, and has posted a great in-depth tutorial that steps through making a submersible data logger. From the blog’s own summary:

In this tutorial, a logger is built using a 3.3v Moteino MEGA with a 1284p CPU @ 16Mhz, w 4K eeprom,16K SRAM for variables & 128K program space. Considerably more than the 328’s 1K eeprom, 2K ram & 32K progmem. Also has a spare serial port for GPS/NEMA sensors.

MoteinoMEGA based Cave Pearl in ‘Prototyping Trim’ with I2C OLED screen & ADS1115 ADC. INT1 & Aref jumpered. The built also includes an RTC backed up by a coin cell.


It’s great to see Moteinos being put to serious work in such interesting and niche projects. While a custom PCB could be built to reduce the amount of wiring and make for a more compact logger/breakout solution, this tutorial is targeted and perfect for those who want to learn the skill of building data loggers or similar projects using off the shelf components. Thanks Ed and the Cave Pearl Project!

Portable RaspberryPi IP Camera Monitor

RaspberryPi projects are always lots of fun, and when combine it with displays, 3D printing and Moteinos, the result can only be awesome!

I had an older RaspberryPi and a touch display, and I wanted a portable IP camera monitor which I can mount or move anywhere. You can build a similar portable display, it will run on battery up to a few hours depending battery capacity – and it will automatically safely shutdown if the battery dips below a programmable voltage. It’s a nice convenient way to monitor your smart home interface, or an IP camera, weather or whatever else.

I had to find a suitable case and this adafruit one was almost perfect as-is. But who uses a Pi with a hard power switch? I wanted to use my own hardware (MightyBoost + Moteino) for battery power and backup, as well as a convenient power and reset button, I had to mod the case and add some holes to make everything fit. I also added some tripod mounts so I could mount this on a tripod or hang it from a shelf or a cabinet. Read on for the build details. I also put together a guide that will be maintained with any future changes to this project.

Continue reading

Weekend Project: Wireless Microscope Light Ring

I have an Bausch & Lomb optical Stereo-Zoom (SZ4) microscope which is a great instrument and not a luxury when you do a lot of SMD prototyping and repairs. The light solution for this was a simple piece of white LED strip powered from a 12V adapter, worked well for over 6 years and I thought an upgrade to this will make a nice weekend project.

To really make this nice and portable it had to be very compact, wireless power from a rechargeable Lithium-Polymer battery. But how can this be powered from 3-4V when the LED strips require 12V?

Watch the details in the video below, along with a demo of laser-cut SMD stencils and complete hand assembly and test of the new light ring.

The before and after shots:


The design files are over at Github. Are you planning to make one or add more features? Did you learn something new from this video? Have a question or other suggestions? Let me know in the comments!

3D printed magnetic holders for pick & place

The LE40V pick & place PCB holders consist of 2 adjustable brackets that are meant to hold the PCB tightly on 2 sides (let’s call them TOP and BOTTOM) while the machine pounds the panel with parts. Typically you’d set the TOP side bracket to a fixed position that is perpendicular to the machine rails and only adjust the BOTTOM bracket depending on the PCB panel size, and hope you won’t snap your freshly solder pasted panel in half when you tighten it in. Also worth noting that by default there is empty space (ie. nothing) below the PCB for support, so I had to add some supports to stop panels from vibrating during placement. While this bracket is perfect for holding trays and very rigid panels, after only a few uses it becomes obvious this is a pretty terrible design for scored/thin panels which buckle under the 2 sided pressure and un/screwing hex nuts every time a new size panel goes in the machine gets old super fast. And yes – I snapped V-scored PCB panels to pieces on more than a few occasions thanks to this mechanism. Now being a super awesome customer oriented company, DDM Novastar will surely take note and improve the PCB holder immediately, maybe using the ideas below.

After some time I added a rigid metal sheet base to properly support panels in the machine during placement and that allowed using magnets to hold the panels instead, a no-brainer makeshift solution. That worked pretty well for a few years but strong magnets are not easy to handle. I thought maybe I can really fix this with a new magnetic bracket and shoot a video of making it happen. The result is below. I am quite thrilled with these holders that can secure the panels quickly and are a snap to adjust without overlapping much PCB area. Here’s a video showing how these work and how I modeled the parts:

You can find the models on Thingiverse or download a Zipped archive below.

Lasercut shipping boxes from scrap

Do you have a laser cutter? Do you need an emergency shipping box?

The USPS Priority Small Flat Rate Box has a nice template that can produce an easy to cut resizable box from the endless supply of throw-away cardboard boxes from your online Prime and other shopping adventures.

I traced a curve after a photo of such a box laid flat on the floor, made some adjustments and ended up with a digital template that can be resized and adjusted to your needs. Makes for some recycled cardboard shipping boxes for those who think they might save a tree or need a quick sturdy box to ship something and don’t have one handy. Maybe this comes useful to someone.

Each laser cutter is different and you will need to experiment with cutting power and speed. Mine is a 60W CO2 laser and the settings I used are 75mm/s with 60% power for cuts and 15% for fold lines.The fold lines are merely scores in the cardboard that help with making easy straight folds. Depending on your laser bed’s size you may enlarge and make larger boxes or put them side by side like a jigsaw puzzle as seen in the first photo.
 

DIY Moteino guide

I posted a short illustrated guide for making your own Moteino from SMD components. It also includes details how to burn the bootloader and fuses. Check it out here. Thanks and credit goes to forum user LukaQ for his contribution of the images and test sketches in this guide!

Controlling AC outlets with SwitchMote

Sometimes you need to remote control an AC outlet that powers something (like a heater or a light or motor etc). There are different IoT solutions out there  like the PowerSwitch Tail which allows hooking up your arduino/IoT device of choice and control 1 outlet.

Naturally, having created the SwitchMote kit, and after being asked in the forums if this could be modded/used to control AC outlets, I made a quick video of how to implement an AC outlet switch-box using a SwitchMote 2x10A, allowing control of 2 independent outlets with local button control as well as visual feedback via the status LEDs of the SwitchMote.

Attic fan tests: 1 week of data

A quick update to the attic fan cooling experiment (check the previous post to read about the setup). I ran the fan for a few days in a row, from around noon to 5PM, at which point the HVAC kicked in until late into the evening. There were some HOT days and some WARM days, with a hot day with PM showers which produced some interesting data. from the WeatherShield sensor motes in the attic and the master bedroom below it. Here’s conceptually how an attic fan is supposed to work, in theory:Benefits of an attic fan

My cheap fan I installed in the attic hatch draws 85W on the high speed and uses ~0.45kWh for a 5h run time), not bad. Here’s the temperature graph after several days with different weather conditions, read on for explanations.Notice the huge temp swings of the attic, and the relatively small changes in the master below it.  July 29th was the HOT day with PM showers and moderate wind which cooled down the attic. I also had the fan going but the rain/wind cooled the attic quickly through the built in soffits and vents. On the rest of the days the fan did a good job of chopping the “hotbergs” tips off, they look like mouse bites :). To be more effective it has to be started soon after the sun starts to blast the roof around 10am. The master temps were zoomed in for more detail. Here are the humidity measurements: Continue reading

Laser Etching SMT Stencils Tutorial

etchedstencils_main

If you make PCBs and have any SMT components you likely need an SMT stencil to apply solder paste and then bake everything in an oven to reflow the paste. I’ve previously written an extensive tutorial on how to etch metal stencils from soda can material, still very popular, dirt cheap to make and pretty quick once you get a feel for it – it produces very high and extremely durable metal stencils. I’ve been literally using chemically etched soda can stencils thousands of times making Moteinos before I moved to stainless steel commercial stencils.

In this blog post I want to show you my new method that I’ve been using since I’ve purchased a laser cutter from china. It’s using the laser to etch stencils out of transparency plastic (mylar). Chances are that you already have membership or access to a local workshop or hackerspace where a laser cutter is available, so you can give this a try. The trick is to balance the power vs speed of the laser at that sweet spot where it won’t burn the plastic or over/under etch the pads. And for those really wondering why in the world I don’t order from OSHStencils (not affiliated with OSHPark) or similar affordable online services – some of it is explained in the video but mainly because instead of waiting a few days I can do it in 5 minutes, and the flat mylar allows making letter sized stencils. Don’t get me wrong, I support and use the OSHPark PCB service but I prefer to etch my own stencils on the fly on my laser, it’s really convenient and allows for errors and retries without another few days of waiting. Plus, I can do in mylar what they can’t in thin curvy kapton.

If laser etching is not an option for you, read below for another alternative method that yields great stencils from plastic transparency mylar. Continue reading

GarageMote WeatherShield Upgrade

Now that WeatherShield is available to take high accuracy temperature, humidity and pressure measurements, it’s time to spread it around the property and watch the trends. I’ve already posted an example of upgrading my mailbox notifier project to include the WeatherShield. In this post I want to show my GarageMote upgrade to add a WeatherShield (WS), this was another quick evening project for today.

The garage is an interesting place to measure that data since it sits in between the house and the bitter winter cold or torrid hot summer. Would have been nice to have this data when I insulated my garage doors to see how effective that was.

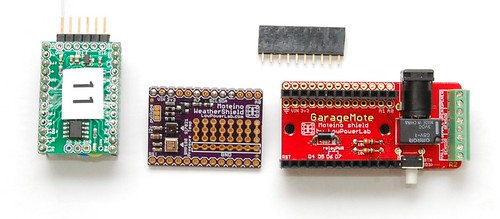
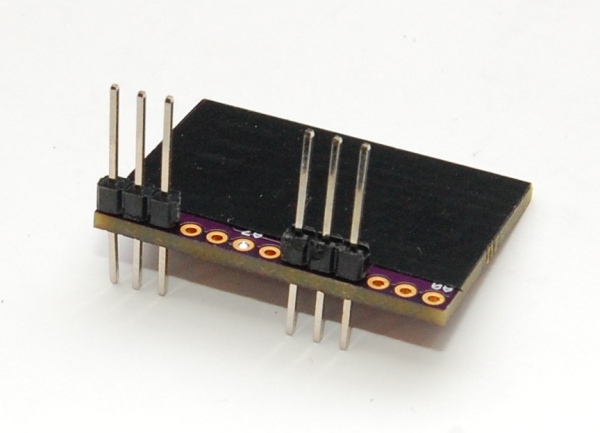
The new GarageMote R2 includes an extra row of pins that are linked to the Moteino top header, which can be used for any general purpose, add more stuff to your GarageMote. This is perfect since WS‘s relevant pins are all on that same side. I had a prototype WS that I chose to stack on top of the Moteino, so male headers get soldered below, but you could also flip it over and have it be side by side the Moteino with headers on top. I shield the bottom of the WS with electrical tape, and soldered a pair of long pin headers with the longer side on the bottom of the WS.

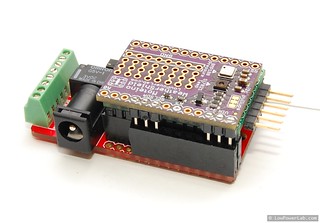
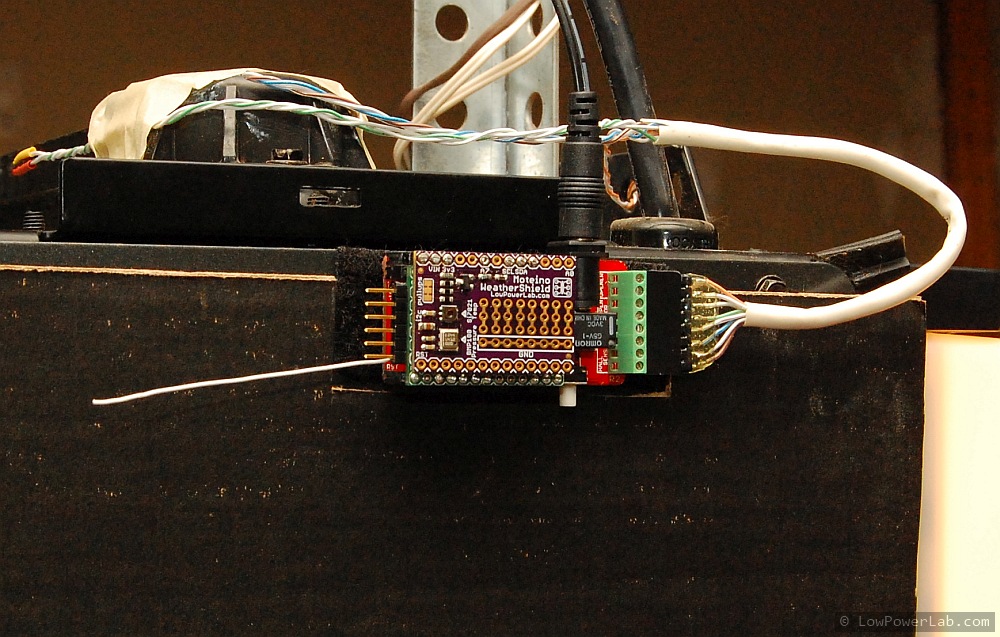
This allows stacking of the WS on top of the Moteino using the female header that I soldered to the empty side header on GarageMote, the extra length headers are clipped off the top of the WS. I then install it back onto the door opener as before. GarageMote is permanently powered so it can afford to leave the transceiver in RX mode which is also necessary to listen for commands from a browser or mobile device (OPEN, CLOSE etc). That means it can also listen for wireless programming tokens, in fact the GarageMote sketch was always programmed that way so if a firmware change is needed it wouldn’t need to be disconnected, but instead reprogrammed wirelessly. The new revision of the GarageMote sketch is updated to include the WS code for periodic reading/reporting of the sensors data (which is excluded by default, and can be enabled by uncommenting the #define WEATHERSHIELD directive).

The resulting data arriving on the gateway looks like this:

F:4397 H:41 P:29.42

where F is fahrenheit degrees in hundreds (divide by 100), H is humidity in % and P is atmospheric pressure in inHg. The data is reported every 5 minutes, enough to get a pretty good resolution in a place that doesn’t expect large sudden fluctuations. Graphing and logging will be added later when I enhance the Gateway stack. For now this just serves as a quick demo and example of how WeatherShield can be used. Enjoy!