
I’m calling it MotionMote because it detects motion and because pretty much every type of wireless sensor or Moteino node name ends in “mote“. The possibilities for home security are endless, put this little guy in a corner near a door or on top of a cabinet somewhere and detect them intrudaz! Did I say there’s no wires?
Read on for details and source code and case design.

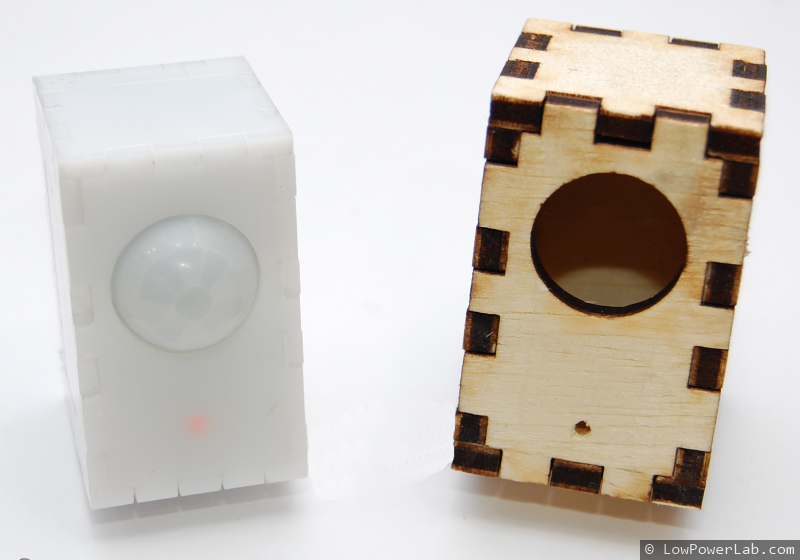
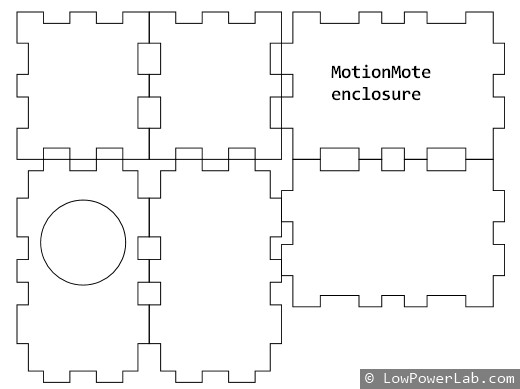
Nothing very complicated about it. I waited to post about it since I didn’t have any casing and I thought it would be nice to enclose it in a nice white acrylic case. I laser-cut a few at Techshop-Detroit using MakerCase. The inside case dimensions are: 59mm long, 29mm wide, 33mm deep, the PIR sensor diameter is 22.5mm. The tab size is maximum (5mm) and material thickness 3mm (1/8″). All other MakerCase settings are default. The laser cutter settings are speed:20, power:90, freq:5000. I started out with wood because there’s always plenty of scraps around and easy to find the right dimensions, then moved to acrylic:
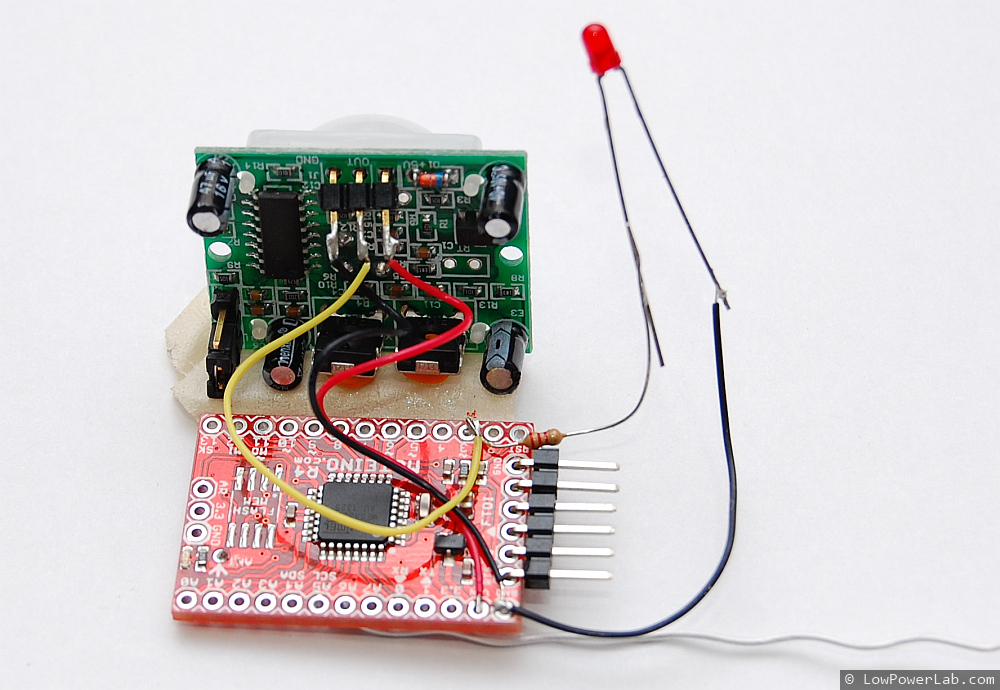
The schematic/wiring is trivial. The PIR sensor has 3 pins – GND, VIN, and OUT. It can take anywhere from 5V to 9V or even more. I used a 9V battery since it’s pretty compact. Later I want to try using lipos with a Moteino shield I am working on, more about it in another post. The OUT pin goes high for a specific length of time when motion is detected (adjustable by side pot, I turned mine to minimum to limit LED power consumption). The sensitivity is also adjustable by another small side pot. The wonderful thing is that this PIR sensor is very cheap (commonly found on ebay for a few bucks) and uses about 60uA when idle and about 200uA when active! Coupled with a low power LED for visual indication the overall power consumption is very low. Of course the Moteino and everything on it has to be put to sleep. The OUT pin is connected to a low power 2mA red LED and to the hardware interrupt INT1 (digital pin D3 of Moteino). This way the sketch sleeps indefinitely, and when motion is detected the LED lights up and Moteino wakes up and quickly sends an ACK-ed “MOTION” alert message.
I made a small 3mm partial hole on the inside of the top plate, just below the PIR sensor cutout. I hot glued the LED in that little hole. So it gives a nice diffused glow when there’s motion. The PIR sensor is also hot glued on top of the Moteino so it would not move too much. I used clear tape to keep the case together and it works just fine. I also tried Weld-On acrylic solvent cement on another case and as it cures the tabs are obscured (acrylic melts from solvent and fills the gaps). Either way works well and I think I just prefer the tape since it’s very accessible.
 |  |  |  |
The sensor is quite sensitive and sensitivity is adjustable. I believe there might be a threshold where pets and small animals can be ignored but I don’t have pets so I don’t care.
The low power Moteino sketch along with case plans are up on Github. If there’s interest I might offer this as a kit that includes the case, low power LED and PIR sensor.
Very nice addition 🙂
What is the price point looking like(ballpark)? I would take 5!
As a kit that would include (PIR, enclosure parts, LED, switch, wiring, shrink tubing, and thinking of adding the parts for a battery level monitor) would probably be around $15 or so but I gotta calculate the costs and my time more exactly. Then you’d buy your Moteino and use hot glue to keep the PIR+Moteino together, and clear tape of weld-on cement to mount the enclosure.
Please let me know when I can order. Need up to 6 depending on price. Thanks
This is great, need to order some more Moteinos now!
Pingback: An Awesome Wireless Motion Sensor
This looks great! Would work perfectly for a small home security system. How difficult would it be to use the Moteinos as a door or window sensor as well? What do you estimate the battery life to be?
Door/window sensors can be made very easily with either a hall effect sensor+magnet (see mailbox notifier project) or with a reed switch. Not sure exactly about battery life but it depends on how much motion there is, every time motion is detected a message is sent and LED is on for a few seconds. At night there should be no motion so that saves the battery a lot. Soon I hope to make these rechargeable (lipo batteries instead of 9V), that way battery life is almost not a concern. Either way my mailbox notifier still runs 9 months later on the same 9V battery (transmits every 8sec). So this should be similar.
Featured on Hackaday….again!
Great work Felix
Found your site via Hack a day. Studying up on the Moteino now. Please make kits available, I will purchase several. thanks
Thanks, I will try to make a kit available soon!
What type of PIR sensor is this?
pyroelectric, infrared
If it doesn’t already have on I would suggest adding a battery monitor to the system. You should have some spare analog IO pins so it should be simple to do. You could have send you a message if the battery needs to be replaced.
That will come soon, yes. It can otherwise be implemented with 2 large resistors and a 0.1uF cap, as described in the mailbox notifier project update post.
No point in wasting power, even with two large resistors. A better method is to use a resistor divider network, with the high side gated by a FET. Turn the FET on when you want to read the battery voltage, off the rest of the time. The leakages is somewhere down in the femtoamps.
http://www.tinymicros.com/images/BatteryVoltage.png
I would do that if I were to built a cell phone, but for this I think I can live with a few extra uA and a single used pin.
Pingback: ATmega328 powers this wireless motion sensor | Bits & Pieces from the Embedded Design World
Add my email to the prospective buyers list. I’d like a dozen for security and home automation.
Very cool remote sensor. I would order at least one kit maybe more. Please include battery voltage monitoring, important for remote locations.
You mentioned using a LiPo battery for longer life, be aware of self discharge. From a quick search I see various numbers for LiPo self discharge, as low as 1% to as high as 8% per month. Contrast that with alkalines at 2-3% per YEAR. However you can store a lot more charge in a LiPo so even with higher self discharge it may work out to longer Moteino run time before a recharge is needed. Frankly I think your mailbox notifier going on 9 months on a 9V battery would work fine for most of the applications I have in mind.
Felix,
I love this little moteinos; They are great and i’m looking forward to order some.
I have a question for you. Is it possible to design a network of sensors (for example) that are relayed (“routed”) through other nodes to the gateway in case some of the nodes are too far from the gateway and can’t be reached directly?
Thanks !
Cosmin – yes that’s possible. You will need to make some kind of relay node to do that, I have a mesh lib that works well but it’s not released to the public. However that means you have to have the radio ON to listen for incoming data and route it, and that’s very expensive battery wise, not really feasible for long running battery operated nodes. For a residential property the RFM69 radios are more than enough, no need for a mesh.
Yes you’re right about battery expense. I was thinking about relaying just for fun and test 🙂 It’s good thing it can be done.
Thank you for your quick answer